| Graphics on the ARM | |
| Roger Amos |
Advanced Vector Graphics Packages
Besides Draw there are now three other major vector graphics/object-based drawing packages for the ARM machines. These are DrawPlus, Vector and ArtWorks. All offer useful facilities not available in Acorn Draw. Although most have their own individual file formats, all accept standard Draw files and will save drawings in that format. This allows artwork from all packages (sometimes with limitations) to be viewed in Draw (ensuring a wide potential audience) or to be imported into DTP and other applications that accept Draw files. It also facilitates the exchange of drawings between applications during preparation so that the various facilities offered by different packages can all be used.
DrawPlus
Jonathan Marten's DrawPlus first appeared in 1991 and is available at nominal cost from many Public Domain and Shareware sources. If you have RISC OS 3 you will need version 2.12 (or later). Although inexpensive, there is nothing unprofessional about DrawPlus, it is a thoroughly competent and polished production -indeed many of its features have been incorporated into Vector (see later).
Intended as an enhanced version of Draw, improving many of its existing facilities and offering some new ones, DrawPlus retains nearly all of the features of the RISC OS 2 Draw and this account will concentrate on the differences between the two packages. My remarks apply to version 2.12 and not necessarily to other versions. To eliminate the few negative aspects first, the New view facility and the little known provision for copying objects between windows are missing. Since the appearance of DrawPlus, the RISC OS 3 release of Draw has appeared offering further facilities such as dithering and interpolation which are not supported in DrawPlus. For a while I used the two applications in parallel, most work being in RISC OS 3 Draw, but with much passing of artwork to DrawPlus in order to use such facilities as its extended zoom and object order control. A new version of DrawPlus which will make use of the new facilities in RISC OS 3 and have some additional features is promised.
Clicking SELECT on the DrawPlus icon opens two separate windows: a plain drawing window exactly like that in Draw with the toolbox turned off and a separate horizontal toolbox window as shown in Figure 5.1. Being a separate window it can be moved around the screen to a convenient spot. It can also be turned off (and on again) via the menus. Beneath the toolbox icons are a status line which describes the last action or selection and an indicator of the currently selected layer (more on layers later)

The first seven icons are identical in function to the top seven icons of Draw's toolbox, being concerned with the creation of path objects. The eighth is an innovation: it creates finished regular polygons, the number of sides being adjustable via the Create menu; the default number is three. Path creation itself is similar to that in Draw but clicking ADJUST deletes the last point created; you double-click SELECT to finish the path.
The text mode icon is as in Draw but you can edit text objects using the cursor keys during preparation and you can also edit finished text objects by selecting them and then entering Edit mode. You cannot rotate text objects, even in RISC OS 3, but there is a built-in text-to-path facility and you can, of course, rotate text that this has converted.
Select mode is much as in Draw but with a few useful innovations. On entering Select mode the last object drawn, edited or imported is automatically selected. Selected objects are distinguished by a solid red boundary box having a handle at each corner; any corner can be SELECT-dragged to rescale the object, while ADJUST dragging any corner will rotate it, but only if it is a path object.
To make it easier to select objects by the 'box dragging' method, the box must encompass the centre of the object. An object that is just touched will remain unselected. This is useful when you get used to the idea. Also you can select objects by clicking SELECT within a millimetre of them- useful when the object is a thin line that is exactly vertical or horizontal and therefore has a boundary box that is infinitesimal in area.
The Select menu offers the familiar facilities plus locking and unlocking of objects. Locked objects can still be selected but cannot be moved, edited or deleted, although they can be copied and saved as selections. New facilities are 'forward' and 'backward' stepping of objects on the data stack- the ability to step a single object forward or backward to its required 'depth' is valuable, especially when the object concerned has become hidden because a grouping operation has brought other objects, normally behind it, to the front. The Arrange menu and the Special menu offer further operations on selected objects; these will be considered later.
Libraries
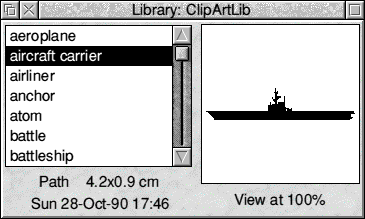
The next icon, which looks like a cube, is the Library icon, Libraries provide an efficient means of storing and retrieving often-used graphics. Supplied with DrawPlus are three example libraries, one containing fancy fonts, one containing electronic circuit diagram symbols and one containing general symbols, mainly cartographic. With library mode selected, clicking SELECT will plot the currently selected drawing from the library at the pointer position. A Library menu includes the Show... option which opens a library window as shown in Figure 5.2. This includes a scrolling list of the titles of the items and a graphics pane in which the item currently selected (by clicking on its name) is displayed. Comprehensive facilities are provided for changing the contents of libraries and creating new ones.
The next icon containing an exclamation mark is an Abandon facility. Clicking on it aborts the current operation and is equivalent to pressing Escape.
The final three icons are all toggle switches; that is to say, each one is a facility that is turned alternately on and off by clicking SELECT on it; all are independent and are used in conjunction with other operations.
The first, which looks like an eight-pointed star, is orthogonal movement constraint. When enabled, it constrains pointer movement to the horizontal, vertical or 45 degrees. When used in conjunction with the rectangle tool, it ensures that the rectangle is a square and with the ellipse tool it ensures that the ellipse is a circle. In path creation it is useful in ensuring that lines are exactly vertical or horizontal, And if you forget to apply it. the Edit menu contains Horizontal and Vertical options that will adjust the endpoint of the selected segment so that it is truly horizontal or vertical.
The icon containing concentric squares is a quick zoom facility. It toggles between actual size (1:1) and any pre-set zoom setting (the default is 2:1). DrawPlus supports zooming up to 99:1 and down to 1:99. Zooming up and down are also available using the keypresses Ctrl-Up and Ctrl-Down and a conventional zoom dialogue box is provided from the Settings menu. Lastly, the lock icon appropriately enough turns grid lock on and off.
Layers
Layers are a facility in DrawPlus which may be new to those whose experience of object-based graphics has been limited to Draw. We shall meet them again in this chapter. The term layer is unfortunately deceptive since it suggests some sort of zoning of the data stack. In fact layers have nothing whatever to do with the positions of objects in the data stack, i.e. their order from front to back. 'Categories', 'levels' and 'overlays' have teen suggested as alternative and more appropriate names, but 'layers' has become accepted.
Every object in the drawing belongs to one of up to 32 layers. You may ignore the facility if you wish, whereupon all objects will automatically be in the default layer 0, named Standard. Each layer may be named or renamed by the user. For instance, if you are drawing a detailed large-scale map of a town, you might have layers named Grid, Streets, Buildings, Features and Labels. Layers are simply categories in which related or similar objects are placed. Their practical value is that whole layers may be made visible or invisible and selectable or unselectable. Incidentally, the default layer 0 is somewhat different to other layers: it is always present; it cannot be deleted or renumbered, although it can be renamed. Furthermore it is always both visible and selectable; this cannot be changed.
So, when you are satisfied with some finished objects and you wish to protect them from accidental movement, deletion or other alteration, you can assign them to a certain layer and make that layer unselectable. The objects in it will still be visible but cannot be altered by subsequent operations. They will not become selected when you are trying to select other nearby objects.
If you should find that those objects are making it difficult to see other parts of the drawing when you are working on them later, then you can make that layer invisible. It will vanish, although still present in the stack. When you have finally finished all the objects you can restore the visibility of that layer and your artwork will be seen in its full splendour.
You will probably be able to think of practical applications for layers quite apart from their assistance in creating artwork. They add an extra dimension to drawings by providing for features to be turned on and off as required, Returning to the example of the map showing a vast range of facilities in the district covered: if all the facilities were shown superimposed, the map would be an indecipherable jumble, but by placing different kinds of facility on different layers, you can choose to make visible only those in which you are interested. 4Mation's smArt linked graphics system, in which different objects become visible depending on the user's menu selections, works in a similar way.
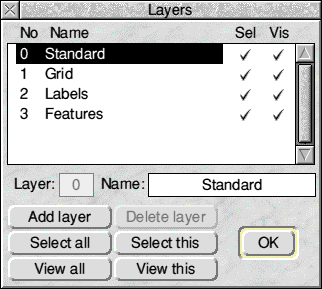
Layers are controlled by a Layers dialogue box (Figure 5.3) called from the Misc menu or by clicking ADJUST on the current layer indicator in the toolbox window. It provides for new layers to be defined and the current layer changed. Objects may be moved to the currently selected layer by selecting them and clicking on a New layer option in the Arrange menu. Layers can also be deleted. This does not destroy the objects in them; objects from deleted layers are transferred automatically to layer 0. If a drawing containing objects in layers is saved in DrawPlus' new format and subsequently loaded into Draw only the objects in layer 0 will be visible.
Incidentally, some versions of DrawPlus have an additional layer-type feature which is related to the order of objects in the stack. It allows you to select certain objects and allocate them as the background. They are moved to the bottom of the stack, i.e. the back of the drawing, and made unselectable so that they cannot be altered except by using a Clear background instruction.
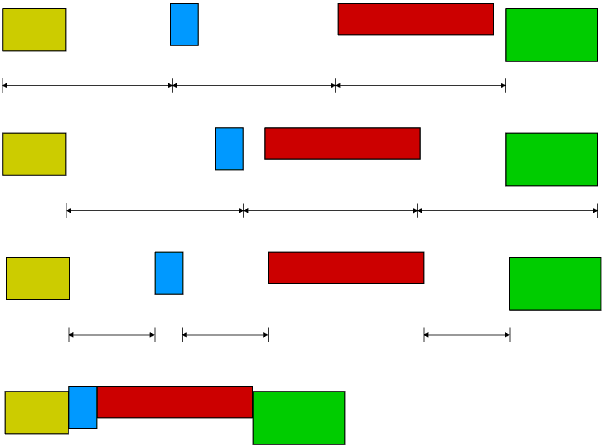
The Arrange menu also controls operations on selected objects. Besides conventional scaling and rotate options, horizontal and vertical skews are available which slew the points in an object a distance depending on the slew angle selected and their distance from a centre line. It will convert rectangles to parallelograms and can turn converted Roman text to an oblique style. Horizontal and vertical reversing (mirroring) are also provided. A size/position dialogue box allows you to position objects with great accuracy. Distribute and space/pack options offer a diversity of interesting ways in which objects can be spaced out or packed together; some of these are shown in Figure 5.4.
The Special menu provides further operations on selected objects. Text-to-path converts text objects to path objects, making them suitable for rotation and other graphical manipulations. Explode text converts a text object to a group of single-character text objects which can then be effectively kerned or spaced using the space/pack options described above. Resize sprite returns a sprite to its natural size, that is the size it had when introduced. Bounding box draws a bounding box in the current path style around the selected object and separated from it by a user-defined distance.
Other new facilities include 10 line patterns in addition to solid lines, which can be tailored to suit your requirements by a facility in the Misc menu. The grid system is more versatile than that in the original Draw allowing the lock grid (the grid on to which objects are constrained) to be coarser or finer than the grid which appears on the screen. This permits the use of a fine lock grid, without the screen becoming cluttered,
When you save a drawing in the 'new format', all the settings, (grid spacing, grid lock on, text and path styles, zoom setting etc.) in force at the time are saved with the drawing and restored when you reload the drawing. This makes it easy to resume a drawing session that was interrupted. In addition to this a Preferences facility (from the icon bar menu) allows you to choose your preferred settings for many variable features in the application and to save these in a file that will be automatically read whenever the application is started up.
All in all, a thoroughly useful application for anyone interested in graphics and, since it is available at PD/shareware prices, exceptional value for money.
Vector
If you have used DrawPlus you will find much in 4Mation's Vector that is familiar. This is hardly surprising since both applications were written by Jonathan Marten. Hailed as 'the enthusiast's drawing package', Vector combines all the features of DrawPlus (such as layers, libraries, bounding boxes and the comprehensive Arrange facilities) and those of the RISC OS 3 release of Draw (such as dithering and interpolation) with several new and fascinating facilities such as 4-point curves, path merge and split, masks and replication. The following description is based on version 1.01, most of my testing being on an A5000.
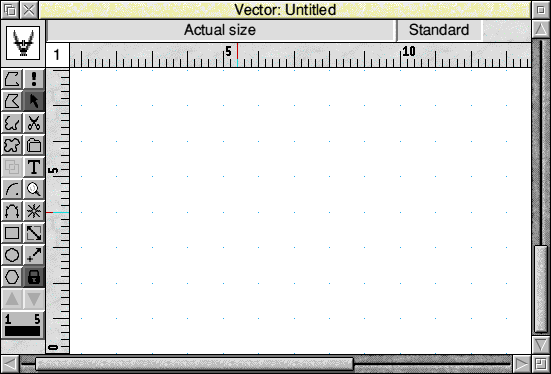
Loading a file or clicking SELECT on the icon bar icon opens a single window more or less like the one shown in Figure 5.5. The toolkit of 22 icons is on the top left-hand side of the window as in Draw and the status line and current layer indicator are at the top of the window, These features may be turned on and off from the Display menu and your preferences may be saved with the drawing.
Many of the icons in the toolkit are identical to those in DrawPlus. There are two new create tools, both concerned with curves. 4-point-curve provides an alternative method of producing curved segments. Its curves have four points: one at each end (so shared with any adjacent segments) and two intermediate points which, unlike Bezier control points, are actually on the path of the curve. These are placed sequentially with the pointer during path creation and so provide a more natural, almost freehand, method of creating curved paths. You can mix 4-point curves and other segment types within the same object. If you subsequently edit the 4-point curves, you find that they have become conventional Bezier curves.
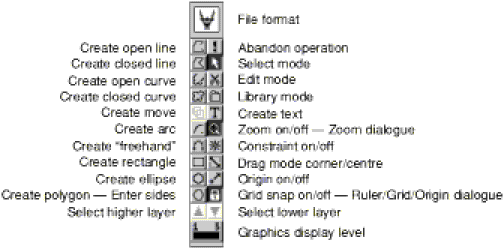
The other new create tool is Arc. With Arc selected your first click defines the starting point of the arc and your second the centre of the circle of which the arc forms part; thereafter the pointer position determines the radius on which the endpoint of the arc lies. Clicking SELECT finishes the arc and allows you to select another tool to add lines, curves, moves or further arcs to your path object. When the object is finished, you find each arc consists of a number of conventional Bezier curve segments (one for each 90 degrees or part thereof).
There are two new toggle tools. Drag mode toggles between corner-corner drag mode and centre-corner drag mode. Corner-corner drag mode is the rough object scaling facility familiar from Draw. SELECT-dragging one corner of the object leaves the diagonally opposite corner fixed and so changes the size and/or shape of the object. In contrast, centre-corner drag mode drags the corner relative to the centre of the object and causes the opposite corner to move an equal distance in the opposite direction. It resizes the object leaving its centre at the same location.
Origin rotate/scale mode toggles between normal rotation and origin rotation. In normal rotation ADJUST-dragging the handles rotates the object about its diametrically opposite corner (not its mid-point as in most packages); while origin rotation rotates the object about the drawing's origin or rescales it using the origin as point of reference. The origin is normally the bottom left-hand corner of the drawing, but an option in the Miscellaneous menu allows you to redefine the origin associated with the current ruler, and you can have up to four rulers per drawing: the rulers also control the grid. It might be useful sometimes, for instance, to have the origin in the centre of the drawing.
The two triangular icons at the bottom of the toolkit provide a quick method of changing the current layer. In other respects the layer system is identical to that of DrawPlus- indeed if you create a DrawPlus drawing with objects on several layers and save it in the 'new format', the resulting file will load into Vector with the layer information intact.
The library system is also very similar, Vector being able to use libraries created by DrawPlus. Even the library file icons are identical. DrawPlus does not recognise Vector's library files unless they are saved in uncompressed format.
Vector defaults to its own compressed file format which reduces most drawings to about 50% of the space they would otherwise occupy and so allows you to fit many more drawings on to a disc. You may, however, save files in standard Draw format. These will of course be compatible with Draw and other applications that use Draw type files, unless they contain objects of types that are peculiar to Vector such as replicas and masks. Vector also offers a compressed Draw format and Poster format.
In RISC OS 3 sprites and text objects can be rotated. Text objects can still be edited after rotation, although they are temporarily returned to the horizontal during editing.
One of Vector's attractions is its excellent provision for working with colour which it appears to have inherited from Chameleon. Although the standard 16 colour palette with the 24 bit sliders appears at every opportunity, you can also call up a 256 colour palette (which only appears in 256 colours if a 256-colour screen mode is in use), a 256 grey scale palette or an RGB colour cube. In RISC OS 3 this produces 256 colours in 16-colour modes and theoretically 4096 colours in 256-colour modes. The latter two facilities depend on RISC OS 3's dithering option to simulate most of the shades. On multisync monitors many of the dithered shades are hardly distinguishable from true palette colours. In fact, the colour cube offers more than 4096 colours; careful moving of the pointer within any of the 256 squares in each slice of the cube will produce a range of shades in the current colour indicator above the OK icon. Another thoughtful touch is that you can save a palette with each drawing- especially useful if your drawing uses shades you have specially mixed.
The style menus for both path and text objects contain two new and useful facilities: Set as default and Apply default. If you select an object and then click on Set as default, its style characteristics will be made the default and will be applied to any new objects that you create. They can also be applied to existing objects if you select them and click on Apply default. This makes it quick and easy to transfer one object's styles to other objects.
Order facilities
Order manipulations are handled by an Order dialogue box from the Select menu. This offers the same four operations as in DrawPlus, i.e. Front, Back, Forward, Backward, but also another valuable provision. If a single object is selected, its position on the stack is displayed, the first (rearmost) object being number 1. This number is writable, so you can move a single object instantly to any desired position in the stack, the objects between its old and new positions being moved one place backward or forward as necessary. This facility will be especially useful to those who use Ace Computing's Tween to create animations from Draw files.
New path utilities
In its Special menu Vector provides a set of path utilities that are not available in Draw or DrawPlus. These are Reverse path, Merge paths, Split subpaths and Split to Lines.
Reverse path simply reverses the polarity of the path, making the starting point the end point and vice versa. The effect is only noticeable if you have employed end caps or start caps since these will move to the opposite ends of the paths or subpaths. It can also affect the application of fill colours if you subsequently merge the path with other paths and apply the non-zero winding rule to the composite object.
Merge paths is a remarkably useful operation that one day will he standard on all vector graphics software. If several path objects are selected, it merges them into one path object having the style of the lowest (rearmost) of the parent objects; each former object becomes a subpath (or group of subpaths) separated by moves (unless the end point of one object and the starting point of the next were exactly superimposed). As in grouping, this operation brings the new object to the top of the stack, i.e. the front of the drawing.
You may wonder what benefits this seemingly obscure operation offers. There are several. Firstly, if you have a number of similar path objects in your drawing, i.e. all share the same style, they occupy far less memory as one combined path object than they do as separate objects, each carrying an identical full set of style data. I reduced one Draw file from 64K to 46K in this way. Moreover the computer will draw them more quickly, since it does not have to repeatedly read and apply the same style information. Secondly, when you merge several overlapping path objects, the winding rule comes into effect regarding the filling of areas where subpaths overlap. This can be used to create some interesting effects such as text which, instead of having a fill colour, is transparent and through which some other design, lying behind, can be seen. Type your text and choose a suitable style (bold fonts work best); use the text-to-font facility and ungroup the transformed text. Now draw a box around the text, select everything and choose Merge path. The effect is similar to reversed-out text: by application of the even-odd winding rule the original text fill colour (black) now fills the box while the formerly black strokes of the text are transparent, like holes in a black stencil. You can of course change the black fill colour if you wish and you can give the text a different outline colour (it will also be applied to the box). Now devise your background design, drag it over the stencilled text and then send it behind. In fact you have used your text as a mask- we shall meet masks again shortly.Split subpaths and Split to Lines both split a selected path object into separate objects. Split subpaths is the exact reverse of Merge paths; it splits the parent object at the moves so that each subpath becomes a separate path object. Split to Lines is more drastic: it makes every segment in the original object (except for any moves) into a separate single-segment path object.
Incidentally, you can use Split to Lines to break up a very large path object and divide it into several smaller ones: having split it. do a box- SELECT on one area and use merge path to combine the paths in that area. Repeat until the original graphic has become as many separate paths as you require, The benefit of this is that the separate objects can have different styles.
Masks
Another interesting facility from the Special menu is the Mask facility. A mask is a special kind of group consisting of a path object overlying another (normally larger) object or group of objects. The two objects are selected and the Mask facility is called: the dialogue box will only allow you to create a mask from the two objects. The effect is that the larger object becomes the fill colour of the path object, being visible only through those areas of the path object that would be filled according to the winding rule currently in force. If some text is converted to path, ungrouped and then path merged, it can be used as a mask over a pattern whereupon the text will appear to have been painted in that pattern. If the Mask operation is applied to an existing mask it will 'extract' it, restoring the two original objects.
Replication
We met replication in Chapter 3 on the font editor. It is a memory-saving form of object copying which does not duplicate the full definition of the original object, but instead places on the stack a pointer to the original, so that the original is reproduced in more than one place. Vector offers two forms of replication. (In fact the Replicate dialogue box from the Special menu also allows an intelligent conventional copy facility which produces rows or columns of full copies at precisely controlled intervals.) A static replica consists of an object replicated at regular intervals in horizontal, diagonal or vertical lines or two-dimensional arrays. The result is one compound object which can be copied or scaled, but not separated or rotated. A static replica can be converted to a dynamic replica. This differs from a static replica in that it can be separated into its constituent replicas and these can be individually moved, scaled, copied or deleted, but they cannot be individually edited and all are technically still one object. A dynamic replica can be further converted to individual objects, allowing the drawing to be imported into Draw and other applications that do not support replication.You can edit the path or style of either kind of replication. The edits are, of course, reflected in all the replicas.
It is possible to extract what is called a 'skeleton' from a replication using the Skeleton option on the Special menu. The skeleton is a set of outlines which represents in graphic form the attributes of each replica, i.e. its size and location. In a dynamic skeleton you can edit the individual outlines and move them around without being encumbered with the replicas themselves which might take some time to redraw. The real advantage of a skeleton is that you can use it to 'arrange' a different original. 4-Mation apparently use a static skeleton to print out their floppy disc labels! When you introduce a new original to a skeleton, you have the choice of either resizing the original to fit the skeleton or resizing the skeleton to suit the original. This has many interesting possibilities where, for instance, a logo needs to be reproduced at several different sizes within a brochure or advertisement.
Yet another specialised type of replication which Vector provides is radiation. In radiation an object is replicated a specified number of times, each copy being superimposed on the original and rotated a specified angle about the original's centre. The operation rapidly builds up intricate floral and other radial patterns which require remarkably little memory. As with dynamic replication, a radiated object can be converted to separate objects to allow its reproduction by Draw and DTP packages.
A radiated object may itself be used in a static or dynamic replication to build up a repeating floral pattern as in the example in Figure 5.9, but these take some drawing- even with an ARM3 each redrawing of the dress took about five seconds. Replication and radiation are ideal for creating repeating patterns, e.g. in fabric and fashion design, wallpapers and for decorated borders. The patterns can of course be placed behind masks to create a variety of interesting designs.
Vector certainly does provide the enthusiast with a powerful tool for graphic and other kinds of design, especially with RISC OS 3. There are, however, a few 'niggles'. Like DrawPlus it lacks the New view facility which I have found useful in Draw, but this omission is offset by the facility to toggle instantly between any pre-set zoom setting and actual size. For technical reasons the zoom maxima and minima are 2000% (i.e. 20:1) and 5% (.i.e. 1:20) which are a little low. In DrawPlus I often found the most comfortable zoom setting for some intricate work to be around 40:1. There is no Undo facility, but an Undelete will restore an accidentally deleted object. Saves to floppy disc on an A5000 seem to take forever, but this is a function of the A5000's operating system; it is actually quicker to save to a RAMdisc, from the RAMdisc load the file into Edit and then save it out of Edit on to the floppy. Vector has many excellent features which are certain to earn it many devoted users.
ArtWorks
The largest, the most expensive and most comprehensive drawing package for the ARM machines, ArtWorks from Computer Concepts differs from DrawPlus and Vector in that it was not written simply as an improved or enhanced version of Draw. It represents a fresh start and is intended as a professional drawing and design package that will provide users of Acorn 32-bit machines with facilities that are similar to if not better than those of Corel Draw for IBM PC compatibles and Aldus Freehand and Adobe Illustrator [or the Apple Macintosh.
As to its capabilities, if you took most of Vector's facilities and added most of those offered by the adjunct software described in Chapter 4, that would give you a rough idea as to what to expect. Even so, ArtWorks has many facilities not available elsewhere for the ARM machines. This description is based on pre-production versions 0.820 and 0.868 in which some features had not yet reached their final production form.
Speed
Redrawing time limits productivity in most vector graphics software. For this reason Computer Concepts, who established their reputation for innovation early in the history of Acorn computers, chose to write ArtWorks from scratch in ARM Assembler rather than the C favoured by many ARM software writers. Consequently ArTworks is very responsive, indeed on an A5000 it is claimed to redraw five times as fast as Corel Draw on a 486-based PC. The code for many of its tools and facilities is contained in independent modules that are loaded and identified one by one at start-up. This makes it easy to customize a package or to update a particular module,
One of the unique features of ArtWorks is its anti-aliased display. Judicious use of intermediate colours along oblique and curved edges makes these appear smooth, quite devoid of the 'jaggies' that often spoil computer graphics. Because this anti-aliasing, together with the blends and graded fills which the software offers, tends to slow down the redrawing, a remarkable control, named rather clumsily the 'WYSIWYG control' (WYSIWYG stands for 'What you see is what you get') allows you to vary the quality of the display. Anti-aliasing takes effect only at the control's maximum selling; turning the control down causes the graded fills and then the simple colour fills to disappear; finally sprites vanish, leaving only the outlines. But at minimum setting the redraw is very fast indeed. Just above minimum is a setting where just outlines and sprites are visible- this is useful if you wish to trace around an imported sprite (a scanned image, perhaps) since you can set the required fills but can still see the original you are copying. And if redraw time still bothers you, you can choose 'interruptable redraw' which designates redrawing as a background task, allowing you to gel on with the task in hand.
Colour
ArtWorks incorporates its own dithering module which, in conjunction with a 'primary palette' of primary colours, carefully chosen to match the output of colour printers, allows a remarkably accurate full-spectrum display in 16 colour modes, while millions of colours are available in 256 colour modes. The dithering is deliberately coarser than RISC OS 3's (4x4 pixel matrix compared with 2x2 pixel matrix) used in Draw and Vector because this allows smoother and more accurate graduated shades; it also makes many more shades available. While the colour is undeniably excellent, the dithering itself is more obtrusive and fine detail is less sharp. There is no facility to turn the dithering off.
Three colour models assist in the creation and choosing of shades. The familiar RGB system offers three sliders each calibrated 0 to 100. so that you might he excused for thinking that not all 16,777,216 colours are accessible, but in fact you can type your entries to two decimal places; indeed ArtWorks performs most of its internal colour calculations to 64-bit accuracy and some to 128-bit accuracy,
We met the HSV system in Chapter 4 in connection with Chameleon 2. ArtWorks offers an HSV colour cube (Figure 5.12). The hue (colour) slider calibrated 0 to 359 degrees determines which slice of the cube is opened, while the saturation and value are chosen as percentages (from 0 to 100%) within the opened slice of the cube; again fractional values are supported. The number of colours available seems vast, but remember that some are duplicated since every cube slice inevitably contains both black (value = 0%) and white (value = 100% and saturation = 0%). The HSV cube is extremely easy to use; at first attempt I matched a shade exactly within a few seconds.
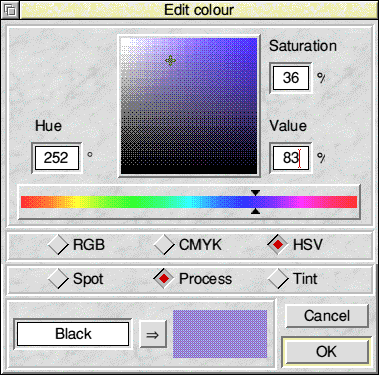
The third colour mode] is the CMYK system (Cyan/Magenta/Yellow/Key) used in the printing industry. The sliders, one for each of the four 'inks', are calibrated 0 to 100% again giving access to millions of colours, but there is huge redundancy since the key (black) tends to swamp the other colours. It is important to remember that the CMYK system emulates the way in which colours are built up in four-colour printing and that in inks, the higher the percentage the darker the colour. Thus with cyan, magenta and yellow all at 100% (irrespective of the key setting) the resultant colour is black! This stands in utter contrast with the RGB system where having all three primaries at 100% gives white!
The CMYK facility will undoubtedly be useful to those using ArtWorks to prepare material for colour printing. Moreover, it is supplemented by a facility to save and print four colour separations and also spot colour separations. (Spot colour is the use of a second colour and possibly a third colour in printing. There is not normally any attempt to mix spot colours, but tints of spot colours can be used to provide additional colour effects.)
Much colour filling in ArtWorks uses graduated shading facilities provided by the linear fill and radial fill tools and the blend tool. all described later. These, together with the dithering described earlier, provide gentle and natural gradations of colour, greatly enhancing the realism of drawings (as Alan Burns' work well illustrates).
Drawing with ArtWorks
Whereas both DrawPlus and Vector can be mastered quickly by anyone familiar with Draw, ArtWorks uses some terminology and conventions that are different. Consequently its use demands a little more thought and, initially, more frequent recourse to the user manual than those other applications.
Clicking SELECT on the icon produces an empty window and clicking in this causes a separate toolkit and a status display (Figure 5.13) to appear. These, as in DrawPlus, can be moved to any convenient location. There are 18 tools in the toolkit. If you don't like their arrangement, you can rearrange them by dragging with ADJUST.
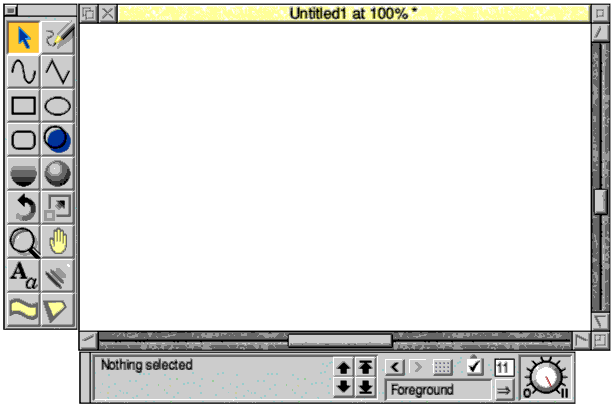
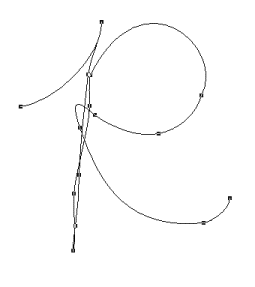
Many of the tools are familiar from other packages, but some are new and some are conspicuous by their absence. Unique to ArtWorks is the freehand drawing tool (Figure 5.14) which allows you to drag the pointer around leaving a trail of the current line width and colour. When you finish your freehand line, ArtWorks converts it to a series of conventional Bezier curves. You can even adjust the accuracy with which ArtWorks performs this conversion.
There is no explicit autoclose facility. To close a path you drag its endpoint on to its start point. This is one of several respects in which ArtWorks follows conventions similar to those of FontEd. Closed paths are called 'shapes' and only shapes can have a fill colour. You can assign a fill colour to an open path. but no filling will take place unless you close it, changing it to a shape. If you insist that an open path should appear to hold a fill colour, you must use a separate shape with transparent lines to hold the colour and group this with the open path; this is how ArtWorks interprets an open path with a fill colour imported from Draw.
An existing lines or shape can be edited by selecting it and then clicking on a line or curve tool in the toolkit. A new set of icons appears in the status display; these are shown in Figure 5.15. They are equivalent to the Edit menu in most other drawing packages. Interestingly, the Break line at point tool will break a line into two daughter lines which of course are independent objects.

Because of the difficulties that thin lines cause in some processes. such as professional type setting (these difficulties were described in Chapter 2) ArtWorks discourages their use. The default line width is 0.25 pt and this width is applied to thin lines in drawings imported from other packages. If you insist on having a thin line. you can set the line width in ArtWorks to 0. This is interpreted as a thin line when imported into Draw.
When editing curves, Bezier control points are only visible and adjustable if the endpoint to which they are attached is selected, another feature in common with FontEd. I find this system far preferable to the infuriating dense tangle of control points that appears when editing complex curved objects in other drawing packages and which has often compelled me to drag five control points out of the way to reach the one that needs attention. When dragging a control point, usefully its original position remains visible on the screen, making it easy to put the point back where it was if you cannot improve it (although a click on the Undo icon or press of F8 will also undo your last action). Multiple point selection
Provided a segment drawing tool is selected, you can select more than one point in an object (by clicking SELECT on the first and ADJUST on subsequent points following the normal RISC OS convention for multiple selections). If you drag one point with SELECT, any other selected segments also move an equal distance in the same direction. This is useful as it allows you to preserve the shape of part of an object while distorting another part of it. You cannot select points in more than one object.
Conspicuous by their absence are moves. As in FontEd moves are implicit. Moves between sub- paths are possible by creating the subpaths as separate shapes, selecting them and applying a Join Shapes menu option which is similar to Vector's merge paths facility. When joined, the subpaths are all one object, the filling of overlapping areas being controlled by the familiar choice of winding rule.
A Make Shapes menu option will convert text to 'shapes', i.e. vector graphics, so that it can be combined with other shapes to create stencil-text and other special effects. Oddly, in ArtWorks there is rather less need for text-to-path conversion. ArtWorks incorporates its own font manager which allows all text objects to be given the same styles- separate line colours, fill colours, line widths and line patterns- as path objects, while remaining text objects with text editable and fonts changeable. Text can even be given graded fills!
Standard shapes such as ellipses and rectangles are supplemented by rounded rectangles. These are stored as tokenised objects rather than as editable vector graphics, but can be converted using the Make Shapes option. Ellipses and rectangles can be forced into squares and circles by a movement constraint facility, provided not by a tool but by the simple expedient of holding the Ctrl key down during the constrained operation. These shapes can be edited using the Make Shapes option.
Many style and transformation options that are controlled by menus in other packages are controlled by tools in ArtWorks. Thus there is a tool for line and fill colours and it applies equally to text and path objects. It leads via the status display (called the 'info bar') to the colour selectors described earlier. Graded fills, linear and radial, are provided by two further tools. Their operation is very similar to their counterparts in Chameleon 2 described in Chapter 4. The rotation and scale tools control scaling or rotation through dialogue boxes-the usual rough rotation and scaling by dragging handles is also provided. Usefully the rotate facility allows you to place an axis of rotation within the object or outside it.
Two tools affect the nature of the display. One is the Zoom facility which has a sophisticated range of options, including the ability to drag a rectangle over an area of interest and have the contained area enlarged to fill the screen. Zoom ranges from 1% (1:100) to 999% (9.99:1). Although the latter is not so high as that available in some other packages, the need for high magnifications is offset by the elimination of control points except on the selected point. Unlike DrawPlus and Vector, ArtWorks allows New Views into the same drawing, with different zoom settings on each.
The Push tool, familiar to users of Impression, allows you simply to drag the drawing around until the required part of it is in the window. All very easy and intuitive.
The envelope tool provides the same kind of distortion facility as the moulds in DrawBender and Typestudio. The perspective tool is a variation on the same theme. It distorts the object so that it seems to disappear into the distance; with text this means that not only is the height reduced but also it is foreshortened; the effect is stunningly realistic. It even indicates a vanishing point, with the promise that later versions will allow more than one vanishing point.
The Edit menu in ArtWorks uses the clipboard principle to allow objects to be cut or copied and pasted elsewhere; these operations will be familiar to users of DTP software. It also offers a Duplicate facility which is similar to the copy facility in Draw and a Clone facility which I expected to produce replications, but the resultant copies are fully independent of the parent object.
Order control, as in DrawPlus, is limited to back, front, backward and forward. But there is a difference: the backward and forward options are 'intelligent' in that they do not necessarily move the selection just one place up or down the stack, but as many places as are necessary to make a difference to the drawing. A forward operation, for instance, will move the object as many places as are required to bring the object in front of whatever object is hiding (part of) it.
A sophisticated interpolation facility is provided in the blend tool. There are several fundamental differences between this and the interpolate/grade facilities in some other packages.
Firstly, the parent objects need not have the same number of points (although better results are obtained if they do). Secondly the intermediate lines or shapes created are not discreet objects at all; the two parent objects and their 'offspring' form a 'blend object' in which only the definitions of the parents and the number of offspring are stored. The offspring are created 'on the fly' during redrawing. This not only results in worthwhile memory savings without imposing too great a burden on redrawing time, but also means that subsequent edits to either parent are immediately reflected in the offspring. Also, parent objects can be shared between blends. An expand facility will convert blend objects to discreet objects if the drawing must be compatible with Draw and DTP packages.
Layers are supported: the layers dialogue box is simpler than in vector and DrawpLus although all the regular facilities are provided. Objects are only editable in the current layer although a multi-layer option allows you to access objects on all layers. To transfer objects from one layer to another you use the clipboard-based cut-and- paste operation. Objects can be locked independently of the layers system.
File interchangeability
ArtWorks will import files created by Corel Draw, Aldus Freehand and Adobe Illustrator and other packages provided they are saved in Adobe EPS (Encapsulated PostScript) format. It will export files in Corel Draw and two Illustrator formats (in fact Illustrator format is accepted by all three) as well as EPS. And of course it has its own file format and will also load and save in standard Draw format.
So, when running on a RISC OS 3 machine which can read and write MS DOS discs, ArtWorks is invaluable to those like myself who use Acorn computers in graphical work for clients who use PCs and who frequently need to swap graphics between several different formats.
Perhaps this is where ArtWorks will find its niche. Acorn computers are widely used in schools and homes where the comparatively high price of ArtWorks may deter users. So far the Acorn 32 bit machines have not made significant impact in professional graphic design houses, but that is hardly surprising because, until recently, there was no professional-quality software. Since the purchase price of an A5000 and ArtWorks is less than half that of a comparable Apple Macintosh with drawing software and slightly less than that of a 486-based PC, Microsoft Windows and Corel Draw while providing a better performance and excellent file interchangeability, ArtWorks could open new and lucrative markets for Acorn computers.


