
|
www.riscos.com Technical Support: |
RISC OS 4 has a comprehensive configuration system contained within the !Boot application. You will find !Boot in the root directory of your hard drive. The configuration program is run by double-clicking on !Boot when a window will open similar to the one shown.
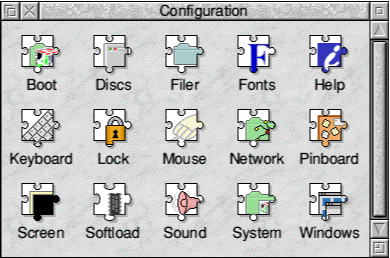
The configure window that appears on your machine might be slightly different and have one or more additional icons as the system has been designed so that third party add-ons can integrate their configuration system into the main one.
It is most unlikely that anything you do using this panel could damage your computer, but you could do something that would prevent it from starting up properly, make your hard drive or CD ROM vanish, or scramble the display. Whatever you do, with a RISC OS computer it is normally possible to get it to work, even in a restricted way, so that you can sort out the problem.
RISC OS's configurations are stored in two places; some are placed in various files within !Boot but some of the most fundamental are stored in CMOS RAM. This is a small amount of memory which does not lose its data when the computer is switched off because its power is maintained by a small battery.
If some parts of CMOS RAM become corrupted the computer may not be able to start up properly. To make sure that this can never completely cripple your machine you can reset CMOS RAM to the factory defaults. To do this switch off the computer and then switch on again while holding down the Delete key. Keep the key held for about 5 seconds before releasing it. This should ensure that the computer will at least start up and display a desktop.
If you alter something that holds its settings inside !Boot then this can be more complex to sort out. One way to get things back to a working state is to switch on the computer while holding down either Shift key. This will start up RISC OS but will not run !Boot, so avoiding the error stopping the computer from running normally.
If you do this you will get a 'minimalist' desktop and you won't be able to run Configure by double-clicking on !Boot. However, in the Utilities folder on your hard drive you should find an application called !ResetBoot . Running this will restore most configuration settings to default values which should get your machine running.
Having described how to get out of trouble if you do manage to scramble your computer's setup we will now describe briefly what each of the icons in the Configure window does.
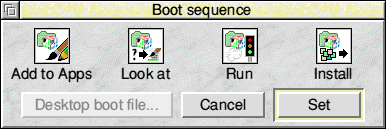
This lets you control what applications are run or set up for use when the computer starts up. Click on the Boot icon in the Configure window and the window shown will appear.
Add to Apps is the first item. Click on this and the window shown below will open. If you have any applications on your hard drive that you want to appear in the Apps folder on the icon bar just drag the application icon to this window and their name will appear on the list. When you have finished click on Set . The next time your computer starts up you will find that the applications are accessible from Apps.
Note that this does not move or alter the original application in any way, it just creates a shortcut to it. This is particularly useful if the application is not in one of the more easily accessible folders on your hard drive.
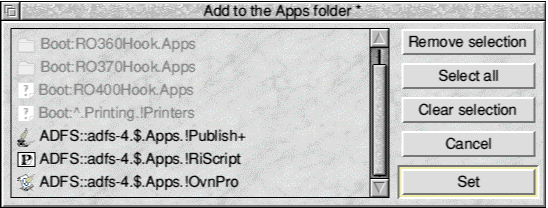
If you want to remove an application just select it in this widow in the usual way and click on Remove selection. This does not change the application itself, it just removes the shortcut to it in Apps.
As with the following two Boot functions it is important only to do this with programs that are on your hard drive. Don't try it with programs that are on a floppy drive or other removable media or you will get errors when the computer starts up as it won't be able to find the applications.
Also if you move the application on your hard drive or otherwise change its location in any way you will need to remove it from this list and then replace it.
Look at is the second item. This will open a window which is almost identical to the Add to Apps window and which is used in exactly the same way.
Applications placed in this window will have their own !Boot files run by the filer when the computer starts up. What this does is to set up any Run Alias for the program, that is, ensuring that if you double-click on one of the application's own file the application will be run, it will also ensure that any files associated with the program are shown by the filer with their correct sprites and not just as a blank box.
You do not need to do this with any program placed in the Apps folder or which is to be Run at startup.
Run opens another window in the same pattern. As you might expect anything appearing here will be Run at startup and will be installed on the icon bar ready to use. You may want to do this with your favourite text editor or other programs you use each time you use your computer such as !Printers.
Install is used to install updated components into !Boot. This may be necessary from time to time. Just click on the icon and follow the instructions in the window which will ope.
Note that for any of these to take effect you must click on Set .
This lets you set the number of disc drives and CD ROM drives. Click on the icon and the window shown will open.
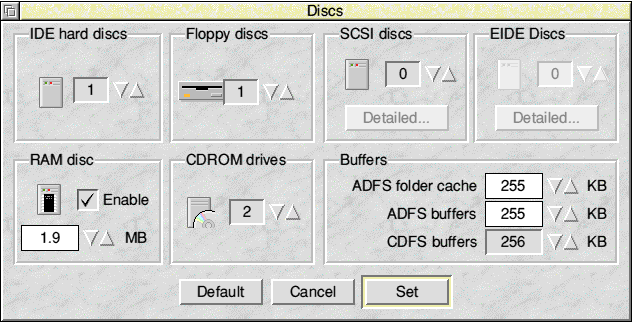
At the top left is the number of IDE hard discs. This is the number of drives attached to your computer's built in IDE interface. Some machines may have third party IDE interfaces and these will have their own system for configuring the number of drives, this option is only for drives connected to the motherboard. Most machines will only have one drive, but if you do fit a second drive you will have to increase this number.
Note that no checks are made to discover if the number you have set it valid. If you configure more drives than actually exist then there will be a long delay of up to a minute when you switch on the computer as it tries to access non-existent drives.
Beside the icon showing the number of drives are two triangular icons, one pointing upward and the other pointing down. These are known as bump icons. Clicking on the upward pointing icon will increase the number; clicking on the downward pointing one will decrease it.
Next to IDE discs is Floppy discs. Unlike hard drives these are checked to make sure that a drive actually exists. If you configure more than the number of drives you actually have you will only get the number that you have, but if you configure fewer than you have you will only get the number of drive icons configured.
The next item in SCSI discs. You will probably not need to use this unless your computer is fitted with a very early SCSI interface such as that made by Acorn. All the more modern SCSI interfaces have their own means of setting the number of drives.
At the bottom left is RAM disc. We have already described the creation and use of RAM discs in the chapter on the Task Manager, but this lets you configure a RAM disc to be always available when you switch on the computer.
You can set the required size of the RAM disc in Mb either by typing in the value or by using the bump icons. To ensure that the RAM disc will be created you also need to make sure that the Option button labelled Enable is ticked as shown in the illustration. If not, just click on it and the tick will appear.
By now you should be able to work out that CD ROM drives sets the number of CD ROMs fitted to your machine and this is set in exactly the same way as hard discs.
In the bottom right hand corner is an area where you can set three further parameters. ADFS folder cache is the amount of memory that is reserved for 'remembering' the information about a folder. This speeds up opening a directory viewer. Below this is ADFS buffers. Again this can speed up certain aspects of data transfer, especially when copying files to a floppy disc. Both of these are normally given suitable default values dependent upon how much memory is fitted to your computer.
Finally there is CDFS buffers. This is use to 'buffer' data being transferred from a CD ROM. This does need to be set manually, and if it is set too low then loading or copying large data files from a CD ROM will be slowed. Unlike the two previous options CDFS buffers can only have certain values so you can't enter a value but must use the bump icons.
When everything is set as you want click on Set . Note that some of these option will only take effect the next time you switch on the computer.
If you make a mistake when setting the parameters in this window you can click on Default and a suitable set of default parameters will be inserted to ensure that your computer will function.
If you click on Filer the window shown below will appear.
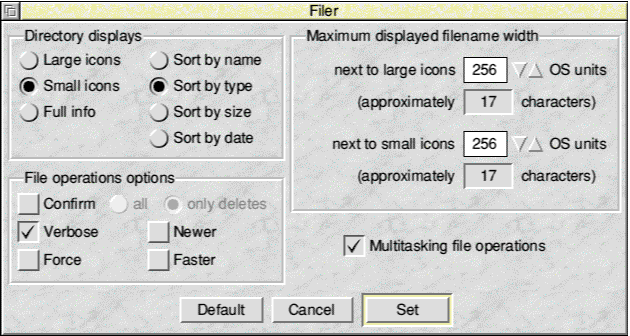
You should be familiar with the items on the left, they are the same as the ones appearing on the Filer menu and were described in the chapter on the Filer. The difference is that the settings here are the ones that apply when you switch the computer on.
On the right you can set the length assigned for file and folder names in Filer windows. If you often use long names you may want to increase this, but this affects spacing between objects in a directory viewer so the more space assigned the further apart they are and the less will be seen at at once in any given sized window.
If Multitasking file operations is not ticked then all operations are carried out in single tasking mode. The computer will then seem to 'freeze' when copying files. This will make copying slightly faster but you won't be able to do anything else until it is finished.
Here you can configure various aspects of the RISC OS Font Manager and also set the font used in most windows and displays.
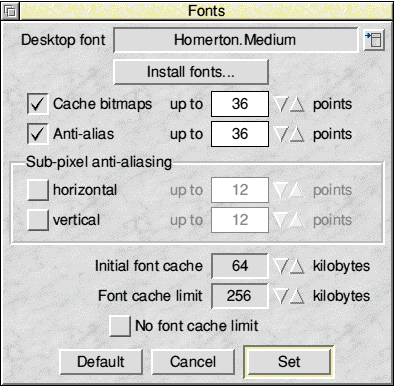
You can change the Desktop font by clicking on the menu icon which will display a menu showing all the fonts available. Although you can select any of these it is probably not a good idea to depart from the standard Homerton font unless you are an experienced user.
The centre part of the window deals with what type of fonts will be cached. Only experienced users engaged in serious DTP work would need to alter these settings.
The area at the bottom sets the size of the font cache. Initial font cache is the amount of RAM allocated by default. If you use a lot of fonts and more is needed this will be claimed from any free RAM until the amount in Font cache limit is reached. If No font cache limit is ticked then as much RAM as required to cache all fonts in use will be claimed. Beware of doing this unless you have a lot of RAM
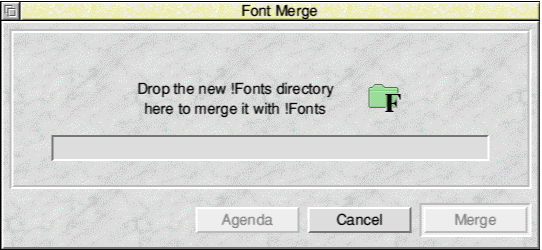
The Install fonts button will open a window to which you can drag a fonts folder to have it merged with the existing RISC OS fonts.
If you have a lot of fonts you will almost certainly require a proper font manager program such as APDL's EasyFont Pro which can switch groups of fonts in and out of action as otherwise your font menus can become extremely long and cumbersome. However, if you only use a small number of fonts the built in system will probably suffice.
The built in Help system operates by opening a small window at the bottom of the screen which displays useful information about the object the mouse pointer is over. To run it just double click on !Help in the Apps folder.
This shows the Help message you would see if you placed the mouse pointer over the title bar of a window.

The Help system is part of RISC OS but the help messages originate with the program that 'owns' the window the pointer is over. Most well written program will display Help messages when you move the mouse pointer over their windows but some may not.
Configuring Help lets you alter some aspects of the way Help works.
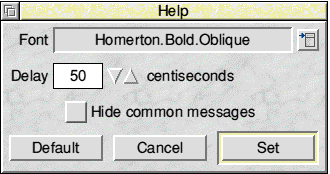
Firstly you can change the font. The main reason for doing this is if you have altered the desktop font and want Help to match.
You can also alter the Delay . This is the time the mouse pointer needs to be over an object before the help message appears. The time shown, 50 centiseconds, means 50 one-hundredths of a second or half a second. If the delay is too short Help messages will be constantly flashing on and off as you move the mouse, which can be rather distraction; if it's too long then you might feel you are being kept waiting too long for the message to appear.
Hide common messages will disable some of the more general messages such as those telling what a Close icon on a window does. Once you are slightly more experienced at using RISC OS you will know what all these things do and won't need Help messages.
This lets you modify the way the keyboard works.
At the top you can set the country. This can be important because some countries arrange the keys differently or have different keys. For example, only a UK keyboard would normally have a '£' key.

PC delete alters the action of the Delete key. Normally both the Delete and Backspace keys will delete the character before the cursor With PC delete ticked the Delete key will delete the character under the cursor, that is, it deletes forwards, which is the normal method on a PC.
Auto repeat is the time you have to hold down a key before it begins to repeat and then how fast it repeats. If you set the delay too short then you may find you ttyyyppe lllliiikkee tthhiiisss.
If Enabled is not ticked then the keyboard will not auto repeat.
The Caps Lock section has three buttons, labelled On, Off and Transpose cases.
If the Caps Lock key on your keyboard is pressed the indicator light in the top right hand corner will come on and when you press the alphabet keys they will appear in upper case. This option sets the Caps Lock key on by default.
Transpose Cases is similar, but some keyboard actions are slightly different. In either case to produce a lower case letter you need to use the Shift key, that is, the action is the opposite of normal for an alphabet key.
The main use for this was when Acorn computers were widely used in schools. If the hard drive is Locked then you cannot access most parts of it or modify or delete data on it except in two places. The first is within the !Scrap directory, which is used by programs for temporary storage of transient data and is hidden within !Boot. The second is the contents of the Public directory. This should be in the root directory of your hard drive, but it may not be present if your machine is not new. This prevented pupils from deleting or modifying any programs or settings as these parts of the drive are locked, but they could access all their own work and files in the Public folder.
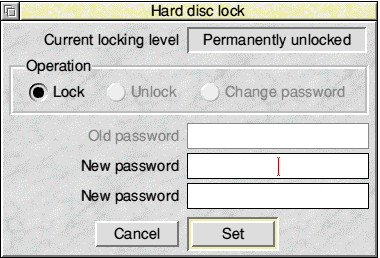
If you do want to lock your hard drive then to set the password you will need to enter it twice to check that you don't mistype it. Then click on Set . This will not take effect until you next start the computer. To unlock the drive again select Unlock and enter the password.
If you forget your password the only way to get access to the hard drive again is to completely reset the computer by switching on with the Delete key held down.
The top item in this window is Mouse speed. This is the relationship between the distance you move the mouse and the distance the pointer moves on screen. The more you drag the slider to the right the more the pointer will move relative to the mouse.
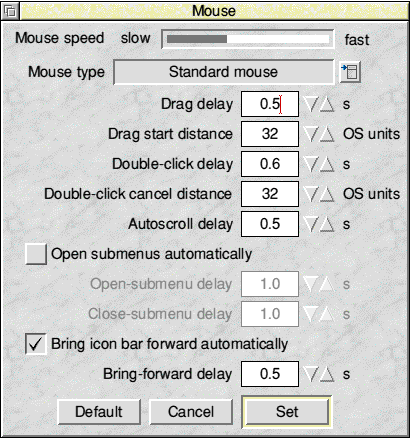
The next item lets you set the type of mouse. For most users this will be Standard mouse. The other options, which can be selected from the menu, are PS2 mouse and two different types of Serial mouse.
Do not select PS2 mouse if you are using a PS2 mouse with an adaptor, these alter the output from a PS2 mouse to make it look like a Standard mouse. This option is for models like the RiscStation, A7000, Omega and Mico which use a PS2 mouse directly
The next two items set the amount of time you have to hold down the mouse button and the distance you have to drag an object before it is interpreted as a drag rather than just being selected.
Double-click delay is the time you have to make the second click when double-clicking on an object. More experienced users may wish to shorten this time from the default of 1 second to avoid two rapid single clicks being interpretted as a double click. Double click cancel distance is the distance you have to move the pointer between clicks for the second click to be interpreted as a new click and not a double click.
Some program, such as drawing or DTP programs, let you drag an object within a window and if you pause at the edge the window scrolls so you can reach the part you want to drag to. Autoscroll delay is the length of the pause before the window scrolls
Open submenus automatically makes submenus of a menu open when you move the pointer over that item and close again when you move off it, like the way sub-menus open in Windows. This is not normal RISC OS practice, but you may prefer it. The two items below it only become active if Open submenus automatically is ticked and let you set the delay before the submenu opens when you move onto the menu item and closes again when you move off it.
Bring icon bar forward automatically is extremely useful. If this is ticked then, if the icon bar is covered by a window, when you move the mouse pointer to the bottom of the screen the icon bar will automatically move on top of the window so that you can get access to it without moving the window.
If your computer is fitted with a network card (NIC) then this lets you set up your computer so that it can talk to other computers via a network.
What follows is a very simplistic explanation. If you are not familiar with computer networking there are various publications and web sites that can guide you through the process properly or your dealer should be able to help.
If you click on the Network icon, the window shown will appear. The three icons correspond to different means of establishing a connection with other computers.
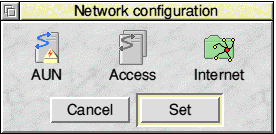
The first, AUN , lets you connect your computer using the Acorn Universal Networking protocol. This means sharing files and folders with a network server and logging onto that server to gain access to files.
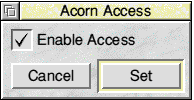
The second, Access , lets you enable peer-to-peer sharing of your files directly with another computer or computers and any network printer you may have connected.
The third, Internet , is used to set up factors relating to your Internet connection.
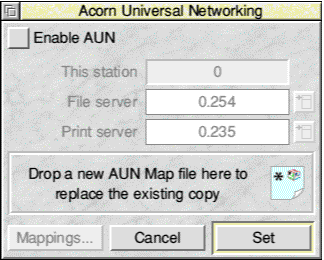
Click on the AUN icon and the window shown will appear. If your computer is part of an AUN network click on Enable AUN then enter as your file and print servers the details provided by your network manager
If you click on this icon a window will open from which you can enable Access. Click on Set and you will find that a new icon has appeared to the right of the disc drive icons the next time you reset the computer.
img src="images/fig64.gif" width="28" height="36" align="bottom" border="0"> If you click on this icon, you will be able to open any available shares from hard discs on computers connected to yours.
To share your hard disc, click with the MENU button on a hard disc icon, move up to the option Share and click either 'Share Protected' or 'Share Unprotected' . To enable access to an individual directory, for example, ADFS::HardDisc4.$.Public , instead of your entire hard disc, press F12 and type -
Share ADFS::HardDisc4.$.Public David
This will share your Public directory, often used to store work, with the name David , but only until you reset the computer.
Clicking on this icon will open the window shown below.
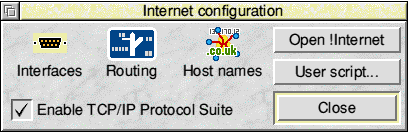
The settings in this window will depend entirely upon your own Internet needs, and will vary between ISP. We recommend that you use a RISC OS literate ISP; then acquire a package such as DialUp to allow you to connect to the Internet without fuss.
This lets you make changes that affect how the pinboard and the RISC OS desktop is presented to the user. Click on the Pinboard icon and the window shown will open.
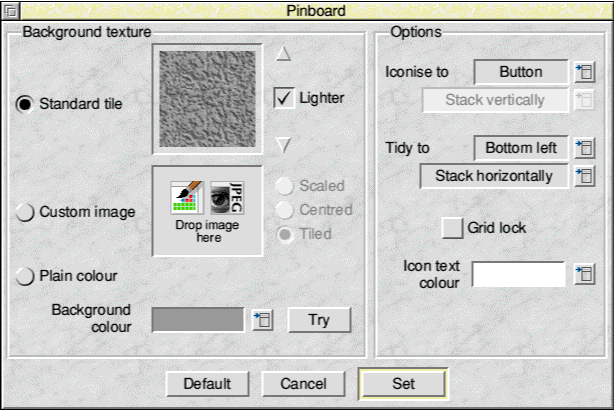
On the left hand side are the various option that let you set how the desktop background or backdrop will appear. There are three options available.
1.You can choose one of the standard tiles supplied with RISC OS. These are selected by using the bump icons beside the tile panel
2.You can import a Sprite or JPEG image to be used as the backdrop by selecting Custom Image and dragging the image to be used to where it says Drop image here. This can be either scaled, centred or tiled. The disadvantage of using a large JPEG is that it can slow down redrawing of the desktop on a machine with a less powerful processor, especially if it is not the same size as the desktop and has to be scaled. It can also take quite a bit of memory.
3.You can have a plain coloured backdrop. The advantage of this is that it takes very little memory.
The right hand side of the window sets the appearance of icons placed on the backdrop and how iconised windows are arranged.
The top item defines what happens when you iconise a window. If you click on the menu icon the menu shown will appear.
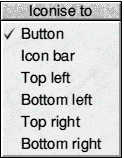
Button means that the icon will be placed on the backdrop exactly where the iconise button was on the window.
Icon bar will put the icon on the icon bar. The main problem with this is that if you iconise a number of windows the icon bar will become rather cluttered.
The remaining items will stack the icons in rows or columns starting at one of the four corners of the screen. If one of these is selected then the next item in the window is activated and you can choose whether you want the icons to be stacked vertically or horizontally from the selected corner.
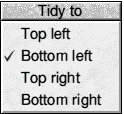
The next section lets you set how file, application and folder icons placed on the desktop are 'Tidied'.
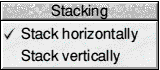
Once again this is done by selecting the various options from two menus. The first sets the corner from which the stack begins and the second if the stack is vertical or horizontal.
Grid lock means that the icons will be locked to an imaginary grid so that they will always be neatly aligned even if not Tidied.
Icon text colour lets you set the colour of the text below the icon. You can choose the colour which gives best legibility with whatever type of backdrop you have chose.
This lets you set the type of monitor you are using, the default screen resolution, number of colours and the screensaver you wish to use.
Before describing how these are set are used we shall explain how the various monitor types are defined. Each monitor is described in a Monitor Definition File (MDF), and these are all stored in a directory named Monitors which can be found inside the Configure sub-directory of the Resources directory inside !Boot. If you purchase a monitor from a RISC OS dealer he may supply you with a MDF for the monitor and if you place it in this directory it will appear on the menu described next so that you can select it.
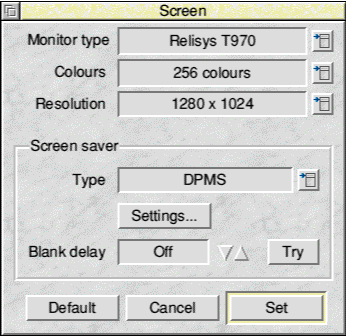
The first item in this window lets you select the make and model of the monitor you are using from the menu. As well as some specific monitor types you should also find the standard Acorn monitors listed. These are all fairly basic monitors, and if you are using a normal CRT monitor and don't have a specific MDF for it then one of these should provide you with basic video.
If you are using a modern high resolution monitor and especially if this is a TFT (liquid crystal or LCD) display you are strongly advised to try to obtain a proper MDF for it. Not only will this let you get the best out of your monitor it will also ensure that you don't damage it as can happen if you use a badly mismatched MDF. There are a number of web sites where these can be obtained and helpful advice is often available from the various RISC OS forums.
Once you have selected the monitor type you can choose the number of colours and the screen resolution. With a normal RiscPC there is a trade off between these two values as only a limited amount of memory is available for the video display and the larger the screen resolution the fewer the number of colours you can use.
If you are using a model such as an Acorn A7000, a RiscStation or Mico you should also be aware that these machine will suffer a speed penalty with high resolution screen modes.
The lower part of the window sets the screen saver. The menu lists the various options available and as well as the ones supplied with RISC OS there may be additional items supplied by third parties.
The screen saver will be enacted if the mouse has not been moved and no key has been pressed for the time set in Blank delay. It is unblanked when the mouse is moved or a key is pressed.
DPMS is a particular type of blanking that can be used with most modern monitors. Instead of just blanking the screen it puts the monitor into a special low power mode. This is particularly useful with large CRT monitors which can consume quite a lot of power. Not only does this save electricity and prolong the monitor's life, the lower power consumption means that the monitor will produce much less heat when blanked, which can be an important factor in hot weather. The disadvantage with this type of blanking is that it can take a couple of seconds for the monitor to unblank.
This lets you configure the computer's sound system. The top item is a slider which sets the default volume. Most people will want this set to maximum as the internal speaker is not very efficient and most external speakers will have a volume control.
16 bit sound should be On unless you have a very early RiscPC 600 which has not been fitted with a 16 bit sound upgrade.
Oversampling should also be on.
System beep is the sound the computer makes when it wants to attract the user's attention, such as when opening an error box. By default this is the sound known as WaveSynth-Beep , but you can alter this if you wish or even add a special sound effect module.
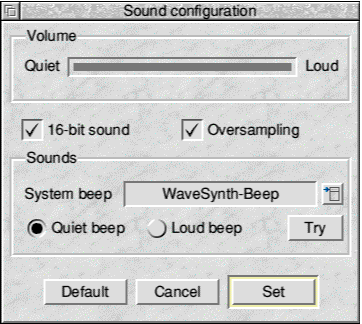
There are two preset volume levels available for this. Normally Quiet will be loud enough but you may need to set it to Loud.
This lets you set a large number of options that control the appearance and behaviour of windows.
When you drag icons and windows around the desktop that is just what happens - the object is dragged by the mouse. This is normal solid drag behaviour, but it takes a lot of processing power, so the alternative is outline dragging. This means that when you drag an object only a dashed outline is actually dragged and the object is only redrawn in the new position or size when the drag finishes. With modern high speed computers this won't be necessary, but with older machines it can make the desktop feel more responsive.
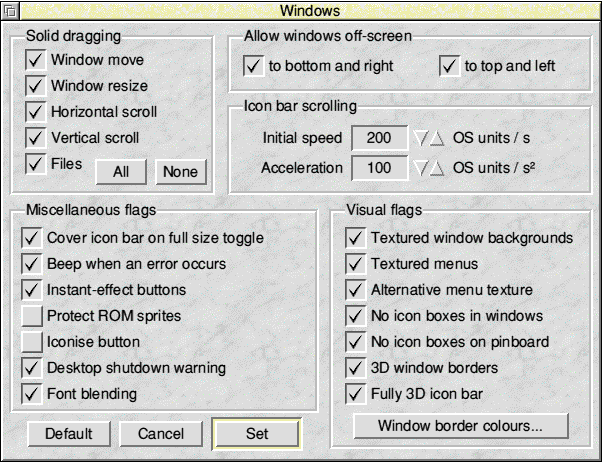
Normally you can drag a window so that part of it is actually off the screen. If these options are not set then windows can't be dragged off the screen in the directions specified.
With lot of programs in use the icon bar can become full. If this happens the icons at the end will get pushed off screen. So that you can still access these icons if you move the mouse pointer to the end of the icon bar then if part of it is off screen it will scroll sideways to bring those icons back into view.
These items let you set how quickly and fast the icon bar scrolls
These are the things that set the appearance of your windows.
Instead of going into a long description of what each of these do it is suggested that you experiment. You can turn the various options on or off and click on Set to see the effect. To get back to the standard settings just click on Default .
Some of these are obvious but some will require an explanation.
If Cover icon bar on full size toggle is set then when you click on a Toggle size icon on a window it will, if necessary, expand to cover the icon bar. If this is not set then windows will only toggle to the top of the icon bar so that the icon bar remains visible.
Protect ROM sprites will stop the standard sprites used for window furniture, buttons, file icons, etc. from being replaced by soft loaded alternatives. Some badly written or old programs may do this and, for example, you may find the normal Option button replaced by something with a small red square in the middle.
If Iconise button is set then this button will appear at the top right of all windows. If it is not set windows won't have an iconise button.
Desktop shutdown warning means that a warning window will appear when you press Shift-Ctrl-F12 or select Shutdown from the Task manager menu. If this isn't set then you will not be warned and given the chance to change your mind, so it is recommended that you leave this set.
Font blending enables anti-aliased fonts in desktop displays. This is one of the best aspects of the RISC OS desktop and so there would normally be no reason to disable it.