| Archimedes Gamemakers Manual | |
| Terry Blunt |
Chapter 4 - Static Graphics
As discussed earlier most modern games require graphics. To compete effectively with commercial games you must have an understanding of what the Archimedes is capable of. In this chapter we will look at most of the aspects of manipulating the screen and a variety of ways in which you can apply the graphic commands. I strongly recommend that you look at the odd 'bits and pieces' pages carried in the Archimedes magazines. These often have excellent routines, and although the program is copyright to the magazine, publication has placed the concept into the public domain so your can safely use your own version.
4.1 Drawn Pictures
You may have already experimented with !Draw as supplied with your machine, and therefore have an idea of the kind of drawing possible and the drawing speed. It is, in fact, possible to use Draw files directly if you understand their format, but that is rather beyond the scope of this book. Instead we will restrict ourselves to handling the drawing primitives directly from Basic. The actual commands available are well described in the BBC Basic guide. What isn't so clear is the way you can combine different drawing modes to the best effect.
First plan any drawing so that you have groups of clearly defined objects, each consisting of lines, circles, etc. It may be best to use absolute coordinates for only the first point of each object, then relative coordinates for all the parts within it. If you include a scaling variable you can then have multiple copies of any drawn object anywhere on the screen. This is the basis for some of the most impressive cartoon style pictures. Listing 4.1 is just an outline of how this can be done.
REM > Draw
:
MODE 13
OFF
GCOL %111110+128
CLG
GCOL %011101
RECTANGLE FILL 0,320,1280,320
GCOL %001000
RECTANGLE FILL 0,0,1280,320
PROCbird(300,900,10)
PROCbird(500,850,8)
PROCbird(650,800,6)
PROCbird(740,780,4)
PROCtree(200,600,3)
PROCtree(150,570,4)
PROCtree(250,570,4)
PROCtree(200,500,6)

PROCtree(100,420,10)
PROCtree(300,420,10)
X%=RND(-43)
FOR X%=4 TO 1280 STEP 28
PROCrock(X%,320+RND(8),RND(3)+1)
NEXT
FOR X%=4 TO 1280 STEP 58
PROCrock(X%,280+RND(32),RND(4)+2)
NEXT
FOR X%=4 TO 1280 STEP 90
PROCrock(X%,200+RND(64),RND(5)+4)
NEXT
FOR X%=4 TO 1280 STEP 220
PROCrock(X%,50+RND(128),RND(10)+16)
NEXT
PROCtree(1200,0,60)
END
:
DEFPROCbird(x%,y%,s%)
GCOL %111111 TINT&C0
IF s%>7 THEN
CIRCLE FILL x%,y%,s%
MOVE BY s%*3,0
ELSE
MOVE x%,y%
ENDIF
MOVE BY s%*4,s%*2
PLOT&A1,-s%*8,-s%*2
MOVE BY-s%*4,0
MOVE BY s%*4,0
PLOT&A1,-s%*8,s%*2
ENDPROC
:
DEFPROCtree(x%,y%,s%)
GCOL %000110 TINT 0
RECTANGLE FILL x%,y%,s%*4,s%*4
GCOL %000100
MOVE BY -s%*10,0
MOVE BY s%*16,0
PLOT&51,-s%*8,s%*8
GCOL %000100 TINT &40
MOVE BY -s%*7,-s%*5
MOVE BY s%*14,0
PLOT&51,-s%*7,s%*7
GCOL %000100 TINT &80
MOVE BY -s%*6,-s%*4.5
MOVE BY s%*12,0
PLOT&51,-s%*6,s%*6
GCOL %000100 TINT &C0
MOVE BY -s%*5,-s%*4
MOVE BY s%*10,0
PLOT&51,-s%*5,s%*5
ENDPROC
:
DEFPROCrock(x%,y%,s%)
GCOL %101010 TINT &C0
MOVE x%,y%
MOVE BY s%*4,-s%*2
PLOT&71,s%*3,s%
GCOL %101010 TINT &40
PLOT&51,s%*2,-s%*2
GCOL %010101 TINT &C0
MOVE BY -s%*7,-s%
PLOT&51,s%*2,s%*2
GCOL %10101 TINT &40
PLOT&71,-s%*4,s%*2
ENDPROC
As the drawing is done in a 256 colour mode colours have been selected using binary notation. This is done to make the red, green and blue components easier to see. The form in bits is bbggrr, giving just four levels of the three primary colours. Once you are sure you have everything as you want it you can easily convert these figures to ordinary decimal notation if memory or speed is critical.
Similarly tints have been shown in hexadecimal for clarity. The only tint values currently valid are 0, &40, &80, &C0. Later versions of RISC OS may allow more steps. A small point that is easily overlooked is that tints retain the value that they were last set at when you change colours, so never assume any tint level. If you use tints then always set the level explicitly at the start of each drawing module.
The plot commands in the drawing modules have been shown in hexadecimal, again for clarity. The first digit is the plot type, such as triangle, circle etc. and the second digit is the plotting mode, such as absolute, relative, inverse.
The objects I've chosen are rather crude, but with ingenuity you can produce a wide range of drawn screens with very little data required for each. Just put the objects you want to draw into a CASE statement and then set up lists of object numbers, positions and sizes, in arrays or lines of data.
You will notice, particularly with the rock drawing, that I have taken pains to make use of the fact that the VDU drivers retain the positions of the previous two points visited by the graphics cursor. If you plan your drawing out on paper first you can use this technique to considerably reduce the number of MOVE statements and so speed up the drawing process.
When building up filled objects remember that the speed of drawing the basic shapes varies quite a lot. In order, fastest to slowest, they are:
- Rectangle;
- Triangle;
- Parallelogram;
- Circle;
- Ellipse.
4.2 Sprites
The drawing methods covered so far are fine for many purposes but where real speed is necessary, as in the active part of an arcade game, they are hopelessly slow. The answer is to use sprite graphics. Sprites can be taken from pre-defined files, constructed from data, or built up by using drawn graphics and grabbing an area of screen enclosing the drawing. By far the best method is to a load pre-defined sprite file. This can be created initially in !Paint, or from one of the many art package. Alternatively you could write a sprite creation program that sends the sprites to file once they have been created using the drawing primitives.
There is virtually no limit to the number of user sprites you can define. Obviously you can't handle too many at once, and the larger the sprites, the more memory taken and the more slowly they will be handled. So when creating moving scenes try to give the impression of a lot of activity rather than actual activity.
4.2.1 User Sprites
Although it may seem easiest to use System sprites they run more slowly and you have less control over them. With this in mind all my examples are with User sprites, where the sprite storage area is in normal RAM available to the program. User sprites are not only more versatile, but enable you to correctly assess memory required without the need for desktop sprite area testing. If you handle them by memory address rather than names they are even faster in execution.
4.2.2 Sprite Masking
One of the features of Acorn's sprite system is that you can choose whether or not you want a mask. Non masked sprites are significantly faster than masked sprites, but the disadvantage is that they always set the rectangular area enclosing the sprite to the background colour effective when the sprite was made. Masked sprites appear to sit on top of the current background as the sprite's own background is rendered transparent.
4.2.3 Sprite Control
Acorn's sprite handling may seem poor compared with some other systems as there are no routines for animation or collision detection, you will have to build these yourself. However you do have considerable independence of screen mode and the ability to modify sprites quickly if necessary, pixel by pixel. You can also plot them in different sizes and proportions to that at their creation. Scaled sprites are much slower though, so don't use them unless you really need to.
4.2.4 A Sprite Example
In Listing 4.2 you can see how to set up sprite handling from scratch. Notice how no assumptions are made and OS calls are used liberally to declare areas and find sizes and addresses. The result is that, colours permitting, the routines will work in any screen mode without any change to the scale or proportions of the sprites. There is a lot you'll have to take 'as is' unfortunately, as there isn't the space to go into all the details. You'd need to examine the Programmers Reference Manual if you want to learn just how the whole of the sprite system works.
REM > Rocks
:
ON ERROR PROCerror:END
PROCinitialise
PROCsprites
OFF
GCOL %100000+128
REPEAT
CLG
FOR I%=0 TO 20
PROCdisplay(rock%,RND(1100),RND(900),RND(3),RND(3),RND(5),RND(5))
NEXT
PRINT TAB(25,11) "Press a key - Return to stop";
UNTIL INKEY500=13
END
:
DEFPROCerror
MODE 12
IF ERR<>17 PRINT REPORT$ " @ ";ERL
ENDPROC
:
DEFPROCinitialise
MODE 15
PRINT TAB(30,11)"Please Wait"
SYS "OS_SWINumberFromString",,"OS_SpriteOp" TO sprite%
DIM block% 19
block%!0=4
block%!4=5
block%!8=-1
SYS "OS_ReadVduVariables",block%,block%+12
xeig%=block%!12
yeig%=block%!16
size%=&2000
DIM area% size%
area%!0=size%
area%!4=0
area%!8=16
DIM scale% 15
scale%!0=1
scale%!4=1
scale%!8=1
scale%!12=1
init%=256+9
def%=256+15
select%=256+24
mask%=512+29
getpix%=512+41
putpix%=512+44   :REM to put pixels in sprite itself use 512+42
                 :REM then add colour%,tint% to end of call
plot%=512+52     :REM for non-scaled use 512+34, much faster
                 :REM then omit all reference to scale%
writeto%=256+60
style%=8         :REM use 0 for non-masked & omit PROCmasksprite
SYS sprite%,init%,area%
ENDPROC
:
DEFPROCsprites
LOCAL x%,y%
x%=202                          :REM repeated    probably better
y%=112                          :REM for         to use an array
rock%=FNdefsprite("rock",x%,y%) :REM each        for multiple
PROCrock(x%,y%)                 :REM sprite      sprite addresses
PROCmasksprite(rock%,x%,y%)     :REM defined
SYS sprite%,writeto%,area%,0
ENDPROC
:
DEFFNdefsprite(a$,x%,y%)
LOCAL add%
x%=x%>>xeig%
y%=y%>>yeig%
SYS sprite%,def%,area%,a$,0,x%,y%,MODE
SYS sprite%,writeto%,area%,a$
SYS sprite%,select%,area%,a$ TO ,,add%
=add%
:
DEFPROCrock(x%,y%)
GCOL %101010 TINT &C0
x%=x% DIV 11
y%=y% DIV 5
MOVE x%*2,y%*4
MOVE BY x%*4,-y%*2
PLOT&71,x%*3,y%
GCOL %101010 TINT &40
PLOT&51,x%*2,-y%*2
GCOL %010101 TINT &C0
MOVE BY -x%*7,-y%
PLOT&51,x%*2,y%*2
GCOL %10101 TINT &40
PLOT&71,-x%*4,y%*2
ENDPROC
:
DEFPROCmasksprite(add%,x%,y%)
LOCAL I%,J%,c%
x%=x%>>xeig%
y%=y%>>yeig%
SYS sprite%,mask%,area%,add%
FOR J%=0 TO y%-1
FOR I%=0 TO x%-1
SYS sprite%,getpix%,area%,add%,I%,J% TO,,,,,c%
IF c%=0 SYS sprite%,putpix%,area%,add%,I%,J%
NEXT
NEXT
ENDPROC
:
DEFPROCdisplay(add%,x%,y%,scale%!0,scale%!4,scale%!8,scale%!12)
SYS sprite%,plot%,area%,add%,x%,y%,style%,scale%
ENDPROC
The method used to produce the sprite is to define a blank one to the correct size then make the VDU drivers draw inside this instead of the screen and then finally restore normal VDU action. This is much neater, if slightly more complicated, than grabbing a sprite directly from the screen.
The first OS call in the initialising Procedure is just a very useful method of finding the internal number of the OS_SpriteOp call. As a variable, sprite%, it then operates much faster than the string form. The next call is used to find the relationship between actual pixels and normal graphic units. This ensures mode independent, consistent and relatively easy positioning of drawn objects within sprites. The last call initialises the area of memory set aside, as a valid sprite area.
In PROCdefsprite the first SYS call creates an empty sprite and the second redirects VDU output to it. The last call finds the address of the sprite, so that all subsequent calls can use this instead of the rather slower name string.
In PROCmasksprite the first call sets up a blank mask for the sprite, with all bits set. Next, pairs of calls test each pixel of the sprite, and if it is the background colour the corresponding mask bit is cleared. You can use a variant of this to actually build up sprites one pixel at a time instead of drawing to them. This can be very useful for modifying a sprite after it has been created. You may want to do this part-way through a game to show damage to an object that is fired at.
Finally, after all sprites have been defined (only one in our example) another redirection call is made in PROCsprites to restore VDU writing to the screen. If you had several sprites to define then you would repeatedly create empty sprites, redirect output to them, draw in them, and create their masks.
Unfortunately RISC OS turns the cursor back on after VDU output re-direction so you must use a second OFF command after the sprites have been defined.
The actual sprite drawing is done by the call in PROCdisplay. For scaling the sprite the multiplication and division factors are dropped directly into the small data block scale% as the procedure is entered.
To see how useful it is to lock all dimensions and scaling together you can very easily change the screen mode to Mode 13. All you need do is change one line, the one that sets the screen mode itself. Everything else will be correctly adjusted, and although the resolution won't be as good, the overall sizes will be identical.
4.3 User Defined Characters
RISC OS supports the older 8 x 8 grid user-defined graphics found in most 8 bit computers. Although limited they are still useful for building repetitive patterned backgrounds. Listing 4.3 produces a variety of striking backgrounds with very little code, even though this has been expanded to make it as clear as possible.
REM > UDCs
:
ON ERROR PROCerror:END
PROCinitialise
:
COLOUR %101011+128
COLOUR %001111
FOR I%=1 TO 8
PRINT TAB(1,I%) STRING$(18,CHR$128)
NEXT
:
COLOUR %111111
COLOUR %001100+128
FOR I%=1 TO 8
PRINT TAB(21,I%) STRING$(18,CHR$129)
NEXT
:
COLOUR %000000+128
COLOUR %111111
FOR I%=10 TO 16
PRINT TAB(1,I%) STRING$(18,CHR$132)
NEXT
:
COLOUR %111100
COLOUR %000011+128
FOR I%=10 TO 16
PRINT TAB(21,I%) STRING$(18,CHR$133)
NEXT
:
COLOUR %000010
COLOUR %101111+128
FOR I%=9 TO 11
PRINT TAB(0,I%*2) STRING$(20,CHR$134+CHR$135) STRING$(20,CHR$135+CHR$134)
NEXT
:
COLOUR %100000
COLOUR %001011+128
FOR I%=12 TO 14
PRINT TAB(0,I%*2+1) STRING$(20,CHR$136+CHR$137) STRING$(20,CHR$138+CHR$139);
NEXT
PROCtidy
END
:
DEFPROCerror
PROCtidy
PRINT REPORT$ " @ ";ERL;
ENDPROC
:
DEF PROCtidy
COLOUR %111111
COLOUR %000000+128
PRINT TAB(0,29);
ENDPROC
:
DEFPROCinitialise
MODE 13
OFF
VDU 23,128
VDU%01111000
VDU%01110111
VDU%10110111
VDU%11001111
VDU%11001111
VDU%10110111
VDU%01110111
VDU%01111000
:
VDU 23,129
VDU%00000000
VDU%01111000
VDU%00110000
VDU%01111000
VDU%00000000
VDU%11000011
VDU%10000001
VDU%11000011
:
VDU 23,132
VDU%00000001
VDU%00000010
VDU%00000100
VDU%00001000
VDU%00011000
VDU%00100100
VDU%01000010
VDU%10000001
:
VDU 23,133
VDU%01000000
VDU%01000000
VDU%01000000
VDU%01111100
VDU%00000100
VDU%00000100
VDU%00000100
VDU%00000100
:
VDU 23,134
VDU%00000000
VDU%01111111
VDU%01111111
VDU%01111111
VDU%01111111
VDU%01111111
VDU%01111111
VDU%00000000
VDU 23,135
VDU%00000000
VDU%11111110
VDU%11111110
VDU%11111110
VDU%11111110
VDU%11111110
VDU%11111110
VDU%00000000
:
VDU 23,136
VDU%10000000
VDU%10000000
VDU%10000000
VDU%10000000
VDU%01000000
VDU%00100000
VDU%00011111
VDU%00000010
VDU 23,137
VDU%00001111
VDU%00010000
VDU%00100000
VDU%01000000
VDU%01000000
VDU%01000000
VDU%11000000
VDU%01000000
VDU 23,138
VDU%00000010
VDU%00000011
VDU%00000010
VDU%00000010
VDU%00000010
VDU%00000100
VDU%00001000
VDU%11110000
VDU 23,139
VDU%01000000
VDU%11111000
VDU%00000100
VDU%00000010
VDU%00000001
VDU%00000001
VDU%00000001
VDU%00000001
:
COLOUR %100000+128
CLS
ENDPROC
You will see that all the VDU 23 character definitions have been broken down into their binary components. The pattern of 1's in the character definitions clearly shows the shape of the characters that have been designed. Once you are happy with the definitions you can compress them into the more normal single line of parameters separated by commas.
4.4 ECF Patterns
A more flexible approach to producing pattern effects is to use the extended colour fill system. There are four of these pseudo colours that can be used with their pre-set patterns or re-defined to a pattern of your choice. There are two ways of defining these fills. One, the default, is a backwards compatible method for the BBC Master. However, there is a simpler native mode, which we will use. This is enabled with a simple VDU 17,4,1| after the screen mode is set. However, in 256 colour modes you must always work in native mode. This is logical, as there is no backward compatibility to be considered in these modes.
A giant ECF pattern can be made by using all four ECF patterns together in similar layout to that of four UDCs. However, the principal advantage of this system over that of blocks of UDCs is that they are used with the graphic drawing commands so you can produce complex shapes containing these patterns. They will also draw faster, but you can only have four ordinary or one giant ECF pattern at a time, whereas UDCs will give you up to 224 single character patterns and, by using a greater number of characters together, much larger multiple character patterns.
Like UDCs, the pattern size is dependent on screen mode when using ECF colours. However it is also dependent on the colours in the mode so that where characters will be printed the same size in modes 9 and 13 the ECF pattern will be smaller in the latter. In listing 4.4 there is an example of a giant ECF pattern that is being used to get a wall effect. We are again splitting up the necessary VDU calls to make the patterning clearer. This isn't quite as straightforward as UDC patterns though, as the relationship of bits to colours is dependent on the screen mode.
REM > Pattern
:
MODE 9
OFF
VDU 23,17,4,1|
VDU 23,2
VDU%01110111
VDU%01110001
VDU%01110001
VDU%01110001
VDU%01110111
VDU%00010001
VDU%00010001
VDU%00010001
:
VDU 23,3
VDU%01110111
VDU%00010001
VDU%00010001
VDU%00010001
VDU%01110111
VDU%00010001
VDU%00010001
VDU%00010001
:
VDU 23,4
VDU%01110111
VDU%00010001
VDU%00010001
VDU%00010001
VDU%01110111
VDU%01110001
VDU%01110001
VDU%01110001
:
VDU 23,5
VDU%01110111
VDU%00010001
VDU%00010001
VDU%00010001
VDU%01110111
VDU%00010001
VDU%00010001
VDU%00010001
:
GCOL 80,1
RECTANGLE FILL 320,256,640,512
CIRCLE FILL 128,128,64
MOVE 1000,800
MOVE 1180,920
PLOT &55,1200,720
END
4.5 Backgrounds
If you look closely at platform games or graphic adventures you will see that they actually have highly repetitive backgrounds despite all the apparent detail. These backgrounds are surprisingly easy to create. Just think of the play area as a grid of squares. If you choose a square size of, say 64 graphic units, the whole screen can be regarded as having 20 columns and 16 rows of cells.
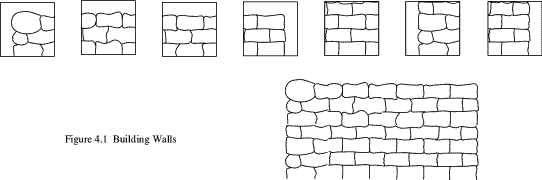
What you do is define a set of sprites that exactly fit the cells. These can be sections of wall, doors, arches, trees or whatever suits the game. You will have to make sure all the elements lock together like a jigsaws, so walls must have brick or stonework that matches on all four sides, and you will need coping sections and end walls as shown in Figure 4.1. Notice how I've used more than one interlocking top middle section to further break up any obvious lines. You should use this duplication with most of the other sections, particularly large areas of the middle sections, where I recommend three or four interchangeable sprites. Game players will be more impressed if the construction method is well hidden.
All your screens can now be defined as lists of sprite names - or addresses if you employ user sprites to the full. With as few as 30 sprites, you can create enormous maps of seemingly totally different backgrounds. It is even possible to arrange for cells to be replaced with others as the game progresses. This is useful for opening doors, collecting objects etc.
As these sprites are for background construction it makes sense to use fixed size, non-masked sprites for optimum speed. Added to this there is the possibility of replacing only the background cells that have any moving sprites on top of them, instead of re-drawing the whole screen. If there is very little movement then this can make massive improvements to your overall efficiency.
Whilst on the subject of backgrounds it is worth mentioning a common technique for increasing the number of apparent colours and giving them a textured appearance. This is known as dithering and involves a number of colours being used either in a fixed pattern or randomly distributed over an area. Both of these arrangements are shown in Listing 4.5
REM > Dither
:
MODE 9
OFF
left%=128
width%=960
bottom%=512
height%=320
GCOL 2
RECTANGLE FILL left%,bottom%,width%,height%
FOR J%=bottom% TO bottom%+height% STEP 12
FOR I%=left% TO left%+width% STEP 12
GCOL 3
POINT I%+4,J%+4
POINT I%,J%
GCOL 7
POINT I%,J%+4
GCOL 1
POINT I%+4,J%
NEXT
NEXT
:
bottom%=128
GCOL 2
RECTANGLE FILL left%,bottom%,width%,height%
FOR I%=0 TO 5000
R%=RND(3)
CASE R% OF
WHEN 1:GCOL 1
WHEN 2:GCOL 3
WHEN 3:GCOL 7
ENDCASE
POINT left%+RND(width%),bottom%+RND(height%)
NEXT
ON
END
4.6 Banked Screens
The screen layout of the Archimedes is such that an area of memory is reserved for the display. RISC OS allows as many screens as can be fitted into this area to be used. The visible screen is simply a window on this area. Such an arrangement lets you have several different screens set up and available for instant display.
The listing 4.6 shows how this can be done for MODE 0. Normally I wouldn't expect anyone seriously to use this mode for games, but it is easier to demonstrate the effect when you can be sure of several banks free.
REM > Banked screens
:
ON ERROR PROCerror:END
PROCinitialise
PROCsetscreens
:
REPEAT
bank%=GET-48
IF bank%>0 AND bank%<max%+1 SYS "OS_Byte",113,bank%
UNTIL bank%=0
:
PROCtidy
END
:
DEFPROCerror
PROCtidy
PRINT REPORT$ " @ ";ERL
ENDPROC
:
DEFPROCinitialise
MODE 8
MODE 0
OFF
DIM block% 12
block%!0=150
block%!4=-1
SYS"OS_ReadVduVariables",block%,block%+8
max%=block%!8 DIV &5000
IF max%>9 max%=9
ENDPROC
:
DEFPROCsetscreens
RESTORE+14
FOR I%=1 TO max%
SYS "OS_Byte",112,I%
COLOUR I%+128
COLOUR I%+1
CLS
PRINT TAB(25,7) "Banked Screens Example"
PRINT TAB(20,13) "Press numbers 1 - ";max% " to select bank"
PRINT TAB(20,15) "Use 0 to finish"
PRINT TAB(20,17) "This is screen bank ";I%
READ text$
PRINT''SPC 5 text$
NEXT
ENDPROC
DATA This is rubbish,This is also rubbish,How much rubbish do you want to read?
DATA Just to prove it's a different screen bank,Yet more nonsense to read
DATA The sixth lot of garbage,Yep! It's me again,Boring isn't it?,The last lot!
:
DEFPROCtidy
SYS "OS_Byte",112,1
SYS "OS_Byte",113,1
CLS
ENDPROC
The SYS call in PROCinitialise establishes how much screen memory is available. You should always do this rather than just assume that people will have sufficient screen memory configured. If the figure returned is too small then your game should tell the player and advise how to allocate more memory to the screen.
The active commands are the OS_Byte calls 112 and 113. OS_Byte 112 determines which screen is written to by the VDU drivers, while OS_Byte 113 sets the screen bank to be displayed. The idea of writing to an invisible screen while displaying another can be a little confusing at first, but once familiar with the concept you will see that it gives a great deal of scope for avoiding unnecessary re-draws.
Multiple screen banks are used to good effect in moving displays. In most cases dual screen operation is the most practical. The idea is that you draw on one screen while displaying the other. Once the re-draw is complete you swap screens and repeat the process for the other screen. In this way none of the actual drawing process is visible no matter how long it takes. This results in a dramatic reduction in flicker. The switchover is instantaneous, but you need a WAIT delay to ensure it takes place at the beginning of a display cycle, otherwise you could briefly display half of each screen. Most of the later examples use this technique.
4.7 Clearing Screen Areas
It may not be realised that there are three methods of clearing an area of screen, all of which have strengths and weaknesses. If you want the entire screen cleared than the most efficient method is by using CLS. This will clear to the current text background colour, as set with COLOUR n+128, taking about two thirds of the time of a CLG command. However, if you want a patterned ECF colour you can't use CLS but will have to use CLG. This clears to the current graphics background colour, defined with GCOL n+128. Surprisingly, the RECTANGLE FILL command works slightly faster than CLG, and this will clear to the graphics foreground.
You will see from this that you can have three different colours set as clearing colours, and if you aren't too concerned about speed, you can just pre-set your colours and select the one you want. However, there's far more to it than that.
Both text and graphic areas can have what are known as viewports defined. For a text viewport this is calculated in character printing rows and columns, whereas a graphic viewport will be normal graphic units. CLS and CLG will then operate only within the designated viewports. If the area you wish to clear can be defined exactly in text rows and columns then CLS is still very much faster than the other two methods and becomes a useful fast rectangle fill.
4.8 Smartening Up
All the examples so far have been rather bland flat-looking drawings, where most games these days use a variety of tricks to give depth to an otherwise ordinary display. A number of special effects have been put together in listing 4.7 to give you some idea of what can be achieved with some quite simple ideas.
REM > Frills
:
MODE 13
VDU 5
GCOL %100000+128
CLG
PROCroll(0,0,1280,1024,2,1,1,FALSE)
PROCroll(128,640,1024,256,2,2,2,TRUE)
PROCroll(896,160,256,416,0,2,0,TRUE)
:
PROCplinth(160,256,256,128,16,2,2,2,FALSE)
PROCplinth(512,128,320,480,16,0,2,2,FALSE)
PROCplinth(544,448,256,128,8,2,1,2,TRUE)
:
FOR I%=64 TO 1152 STEP 64
PROCstud(I%+32,928,12,1,2,0)
PROCstud(I%+32,96,12,2,2,1)
NEXT
:
GCOL 0 TINT &C0
PROCshadow("This is a test",400,800-16,%11,0,4)
PROCshadow("This is a",140,544,%1111,%10,4)
PROCshadow("test too!",140,496,%1111,%10,4)
PROCshadow("Hello",208,336,%010101,%111111,4)
PROCsize(15,24)
PROCshadow("Boo!",560,556,%1110,0,8)
PROCsize(15,64)
PROCshadow("2",996+8,476-8,%1111,%1,4)
PROCshadow("2",996,476,%11,%1111,4)
:
VDU 4
PRINT TAB(3,24);
END
:
DEFPROCroll(left%,bottom%,width%,height%,red%,green%,blue%,fill%)
lowcol%=red%+(green%<<2)+(blue%<<4)
red%-=(red%>0)
green%-=(green%>0)
blue%-=(blue%>0)
highcol%=red%+(green%<<2)+(blue%<<4)
FOR I%=0 TO 3
GCOL lowcol% TINT I%<<6
PROCbox(I%<<2)
NEXT
FOR I%=0 TO 3
GCOL highcol% TINT I%<<6
PROCbox((I%<<2)+16)
NEXT
IF fill% THEN
GCOL highcol%
RECTANGLE FILL left%+64,bottom%+64,width%-128,height%-128
ENDIF
ENDPROC
:
DEFPROCbox(i%)
RECTANGLE left%+i%,bottom%+i%,width%-i%*2,height%-i%*2
RECTANGLE left%-i%+60,bottom%-i%+60,width%+i%*2-120,height%+i%*2-120
ENDPROC
:
DEFPROCplinth(left%,bottom%,width%,height%,edge%,red%,green%, blue%,invert%)
LOCAL right%,top%,lowtint%,hightint%
right%=left%+width%
top%=bottom%+height%
lowcol%=red%+(green%<<2)+(blue%<<4)
red%-=(red%>0)
green%-=(green%>0)
blue%-=(blue%>0)
highcol%=red%+(green%<<2)+(blue%<<4)
hightint%=&C0
IF invert% THEN
SWAP lowcol%,highcol%
SWAP lowtint%,hightint%
ENDIF
GCOL lowcol% TINT lowtint%
MOVE right%,top%
MOVE right%-edge%,top%-edge%
PLOT &55,right%,bottom%
PLOT &55,right%-edge%,bottom%+edge%
PLOT &55,left%,bottom%
PLOT &55,left%+edge%,bottom%+edge%
GCOL highcol% TINT hightint%
PLOT &55,left%,top%
PLOT &55,left%+edge%,top%-edge%
PLOT &55,right%,top%
PLOT &55,right%-edge%,top%-edge%
GCOL lowcol% TINT hightint%
LINE left%,top%,left%+edge%,top%-edge%
LINE right%-edge%,bottom%+edge%,right%,bottom%
RECTANGLE FILL left%+edge%,bottom%+edge%,width%-edge%*2,height%-edge%*2
ENDPROC
:
DEFPROCstud(x%,y%,s%,red%,green%,blue%)
lowcol%=red%+(green%<<2)+(blue%<<4)
red%-=(red%>0)
green%-=(green%>0)
blue%-=(blue%>0)
highcol%=red%+(green%<<2)+(blue%<<4)
GCOL lowcol% TINT &C0
MOVE x%,y%+s%
MOVE x%+s%,y%
PLOT &55,x%,y%
MOVE x%-s%,y%
PLOT &55,x%,y%-s%
GCOL lowcol% TINT 0
MOVE x%+s%,y%
PLOT &55,x%,y%
GCOL highcol% TINT &C0
MOVE x%-s%,y%
PLOT &55,x%,y%+s%
ENDPROC
:
DEFPROCshadow(t$,x%,y%,col%,shade%,gap%)
GCOL shade%
MOVE x%+gap%,y%-gap%
PRINT t$
GCOL col%
MOVE x%,y%
PRINT t$
ENDPROC
:
DEFPROCsize(x%,y%)
VDU 23,17,7,6,x%;y%|
ENDPROC
The first, and probably oldest, idea is to use a shadow style of printing for text. This gives the impression that the text is slightly above the background rather than on it. There is nothing complicated about this. All you do is print the text twice in contrasting colours. The shadow colour is printed first, usually below and to the right of the top colour. When the latter is printed it partly obscures the shadow coloured text. Changing the offset between the two colours can be used to alter the apparent height of the text above the background. PROCshadow is the routine that does the work, and you can see that it is very short.
Another idea is to use a plinth effect. In our example a 256 colour mode has been used which lets us set up colours for the various parts of the plinth automatically. The parameters for colours that are passed determine the amount of red, green and blue components present. Two shades and a tint change are calculated from this information, so only values 0,1 and 2 can be accepted as colour levels. Although this gives a rather restricted range of colours it is easy to implement. If you want greater control you can change the procedure header so that you pass the actual colours that you want for all sections of the plinth. If you wanted to use plinths in the 16 colour modes then you would have to do this in any case.
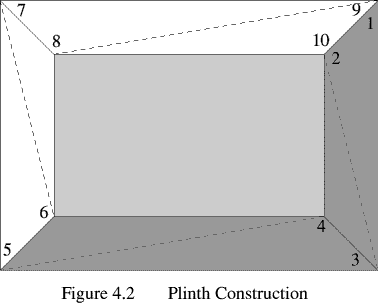
Although there seems to be a lot of code in PROCplinth the method is quite straightforward. If you look at figure 4.2 you will see how the structure is broken up into a rectangle, two lines and eight triangles, two to each side. Referring to the program listing you will see I've managed to pack the triangles in such a way as to keep the number of plotting points to the absolute minimum. The points visited while the triangles are drawn are numbered 1 to 10. Only the first two are move commands, all the rest are PLOT &55. After point 6 has been visited the colour is changed. Colour changes have no effect on plotting positions. It is easy to forget this, and try to make each shape self-contained. This simply wastes time.
A variation on plinths is to use rolled instead of chamfer edges. This is actually easier to implement than plinths. PROCroll uses a similar colour interpolation to PROCplinth, but in this case two shading levels and all four tint levels are used to get a smooth change of hue from the darkest part at the edges to the highlight in the middle of the edging. Unlike plinths there is no control over the width of the edging. This could be done but would add the complication of calculating how many shades and tints to use to maintain a smooth shading effect.
Instead of using triangles the routine draws pairs of squares on common axis. The largest and smallest are drawn first in the darkest colour, then the tint lightened and another pair drawn, touching the first pair inside the largest and outside the smallest. This is done for all four tints, then the process repeated for the lighter shade. The spacing of the squares is set to exactly the pixel width for optimum speed. To use higher resolution modes you will need to plot the rectangles closer together and plot more of them. This slows things down, and in modes with rectangular rather than square pixels the effect isn't so good.
PROCstud uses triangles to produce an attractive nail stud effect. Only four are needed and again the colours are controlled by separate RGB components.
A useful feature of RISC OS is its ability to scale the size of the system font when printing to the graphic cursor. This is handled by PROCsize, and as you can see has a single VDU call. This scaling technique lets you change the size of the text to fit the space available, rather than having to squeeze other things up to make room.
4.9 Fancy Fonts
Although useful in it's own right the real relevance of scaling the system font is in conjunction with the font manager. If you make use of the font manager and the font you want is not available then instead of disrupting the player with a request for fonts that he or she may not have all you need do is swap to using the system font. You then scale this to the same proportions you would have used with the font manager. Listing 4.7 is a short program that does this. The program works in any 16 or 256 colour mode, maintaining accurate scaling, but due to the way it is designed only one colour at a time can be used in the 16 colour modes.
REM > Fonts
:
PROCinitialise
GCOL ((8>>2)+((12>>2)<<2)+((12>>2)<<4))
RECTANGLE FILL 0,512,1280,256
PROCcolour(0,12,12,8,12,12)
PROCwrite("A rather good test",128,680)
GCOL ((4>>2)+((8>>2)<<2)+((0>>2)<<4))
RECTANGLE FILL 0,256,1280,256
PROCcolour(15,15,4,4,8,0)
PROCwrite("Another colour pair",128,420)
PROCtidy
END
:
DEFPROCinitialise
MODE 13
width%=28
height%=44
font$="Trinity.Medium.Italic"
char%=width%*2
yoffset%=height%*1.5
hmatch=height%/1.8
SYS "Font_CacheAddr" TO version%
IF version%<200 font%=0 ELSE PROCcallfont
IF font%=0 PROCsysfont
ENDPROC
:
DEFPROCcallfont
SYS "Font_ReadScaleFactor" TO ,fontx%,fonty%
SYS "Font_ReadFontMax" TO f0%,f1%,f2%,f3%,f4%,f5%
SYS "Font_SetFontMax",f0%,f1%,50,50,f4%,f5%
DIM buffer% 40
more%=0
REPEAT
SYS "Font_ListFonts",,buffer%,more%,-1 TO ,,more%
UNTIL $buffer%=font$ OR more%=-1
IF $buffer%=font$ THEN
SYS "Font_FindFont",,"Trinity.Medium",width%*fontx%>>4,hmatch* fonty%>>4,0,0 TO font%
ELSE
font%=FALSE
ENDIF
ENDPROC
:
DEFPROCsysfont
VDU 5
DIM block% 19
block%!0=4
block%!4=5
block%!8=-1
SYS "OS_ReadVduVariables",block%,block%+12
xeig%=block%!12
yeig%=block%!16
VDU 23,17,7,6,width% DIV xeig%;height% DIV yeig%|
ENDPROC
:
DEFPROCcolour(redfore%,greenfore%,bluefore%,redback%,greenback%, blueback%)
IF font% THEN
SYS "Font_SetPalette",,0,1,14,(blueback%<<28)+(blueback%<<24)+
 (greenback%<<20)+(greenback%<<16)+(redback%<<12)+(redback%<<8),
 (bluefore%<<28)+(bluefore%<<24)+(greenfore%<<20)+(greenfore%<<16)
 +(redfore%<<12)+(redfore%<<8)
ELSE
GCOL ((redfore%>>2)+((greenfore%>>2)<<2)+((bluefore%>>2)<<4))
ENDIF
ENDPROC
:
DEFPROCwrite(text$,x%,y%)
IF font% THEN
MOVE x%+char%*LEN text$,y%
SYS "Font_Paint",,text$,%10000,x%,y%-yoffset%
ELSE
MOVE x%,y%
PRINT text$
ENDIF
ENDPROC
:
DEFPROCtidy
IF version%>=200 SYS "Font_SetFontMax",f0%,f1%,f2%,f3%,f4%,f5%
IF font% SYS "Font_LoseFont",font% ELSE VDU 4
ENDPROC
No assumptions are made in the program and all information needed for scaling and selecting is drawn from RISC OS via SYS calls. The first, in PROCinitialise, checks whether the outline font manager is installed. If not then scaled system fonts are used. The older bit-mapped manager returns results in the 100 range.
If the font manager is active then PROCcallfont reads the scaling factor. This is is 400 by default, but it's best not to assume it hasn't been altered. It represents the relationship between the manager's internal units and normal graphic units.
Next the Fontmax figures are read. The ones of interest are Fontmax 2 and Fontmax 3. These set the font size above which anti-aliasing is no longer applied. The next call actually increases this from the default to ensure that anti-aliasing is available at all reasonable screen printing sizes.
The following call is inside a loop so that it can try to find the font we want to use. If none are available, or the one we want is missing, then scaled character printing is used instead. If you prefer you can check against two or more fonts that are similar by having another string test at the exit of the REPEAT-UNTIL loop. Finally, the required font is set using the last call in PROCcallfont.
Although fonts are supposed to be the same overall dimensions when at the same scaling factor there are significant differences between some fonts, so you will need to select the font that best matches the screen layout you intend to use. The constants at the beginning of PROCinitialise are used to make fine adjustments so that font proportions accurately match character printing.
If any of the font checks fail then PROCsysfont finds the vertical and horizontal pixel scaling factors and the VDU command adjusts the proportions of the system font accordingly. Bear in mind that the system font can be one that you have designed yourself and loaded from a file.
PROCcolour uses a variant of our bit manipulation for red, green, and blue foreground and background colours. Four bit numbers are used instead of two bits, and the colour control tries to get an approximate match between outline font colours and system font colours. The background values must be set to the actual background colour that the font is to be painted onto so that the anti-aliasing can correctly blend colours. To make these background colours easier to follow the GCOL command used before each background rectangle fill is laid out in the same format as PROCcolour. Background colour is irrelevant when using the system font as, with graphic printing used, the background is transparent.